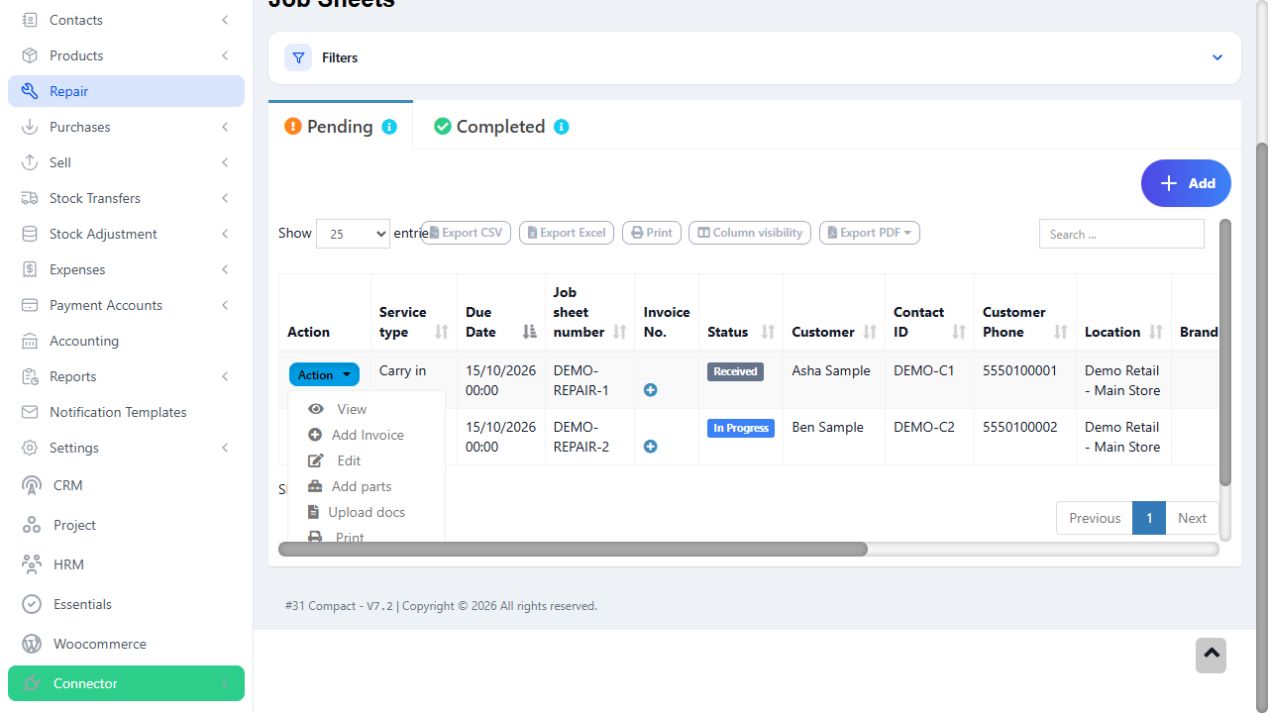
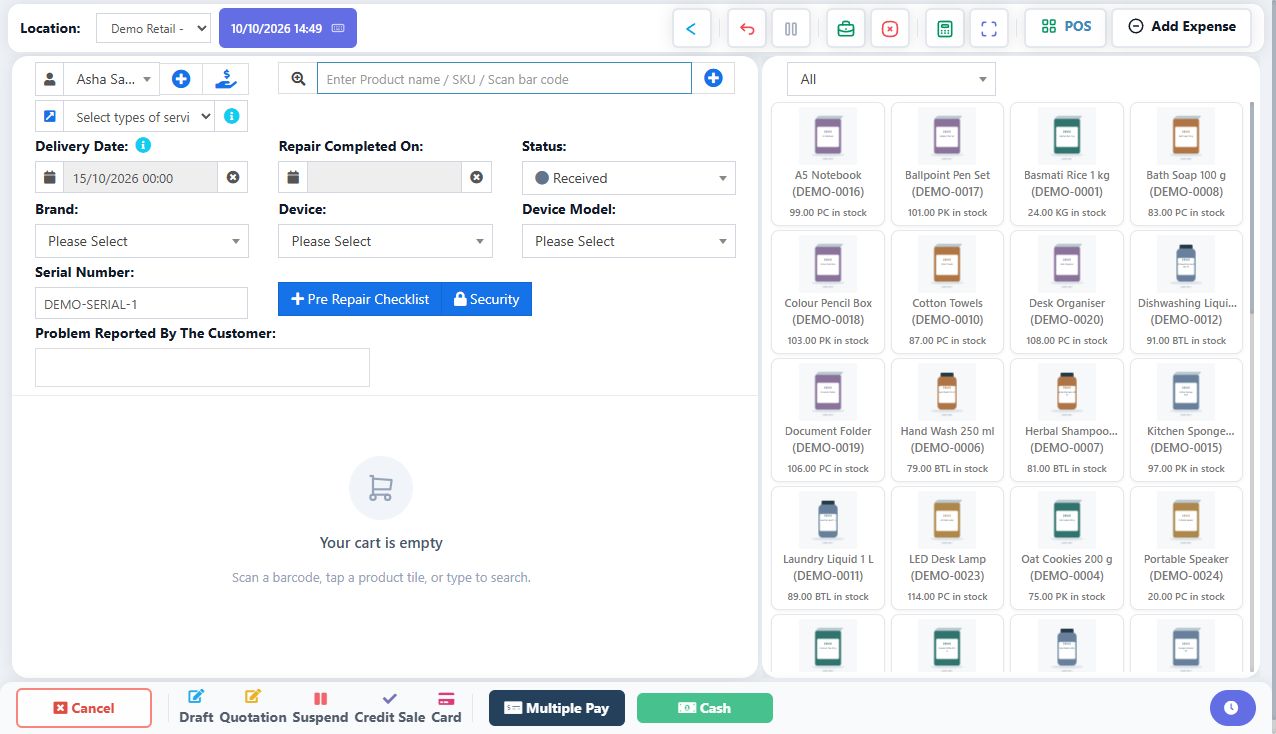
Repair separates physical intake from billing. A job sheet records the customer device, reported issue, condition, technician and progress. A repair invoice charges for agreed parts/work and records payment. A status such as Ready for collection describes the job; Paid describes the invoice. One does not automatically prove the other. Use the web Repair menu for the full job-sheet workflow; the native retail POS is not a replacement for its technician screens.
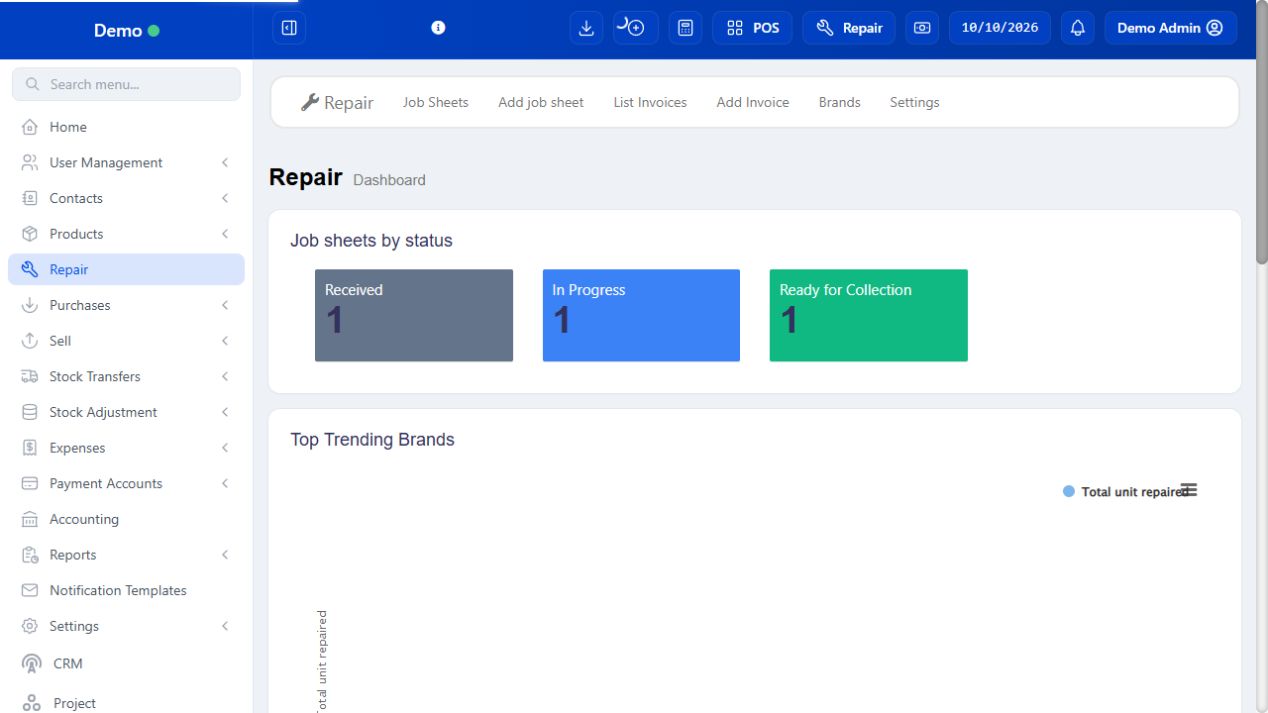
SCREEN GUIDE Repair — module overview. Select the screenshot to enlarge; optional fields may differ in your business.
Field reference
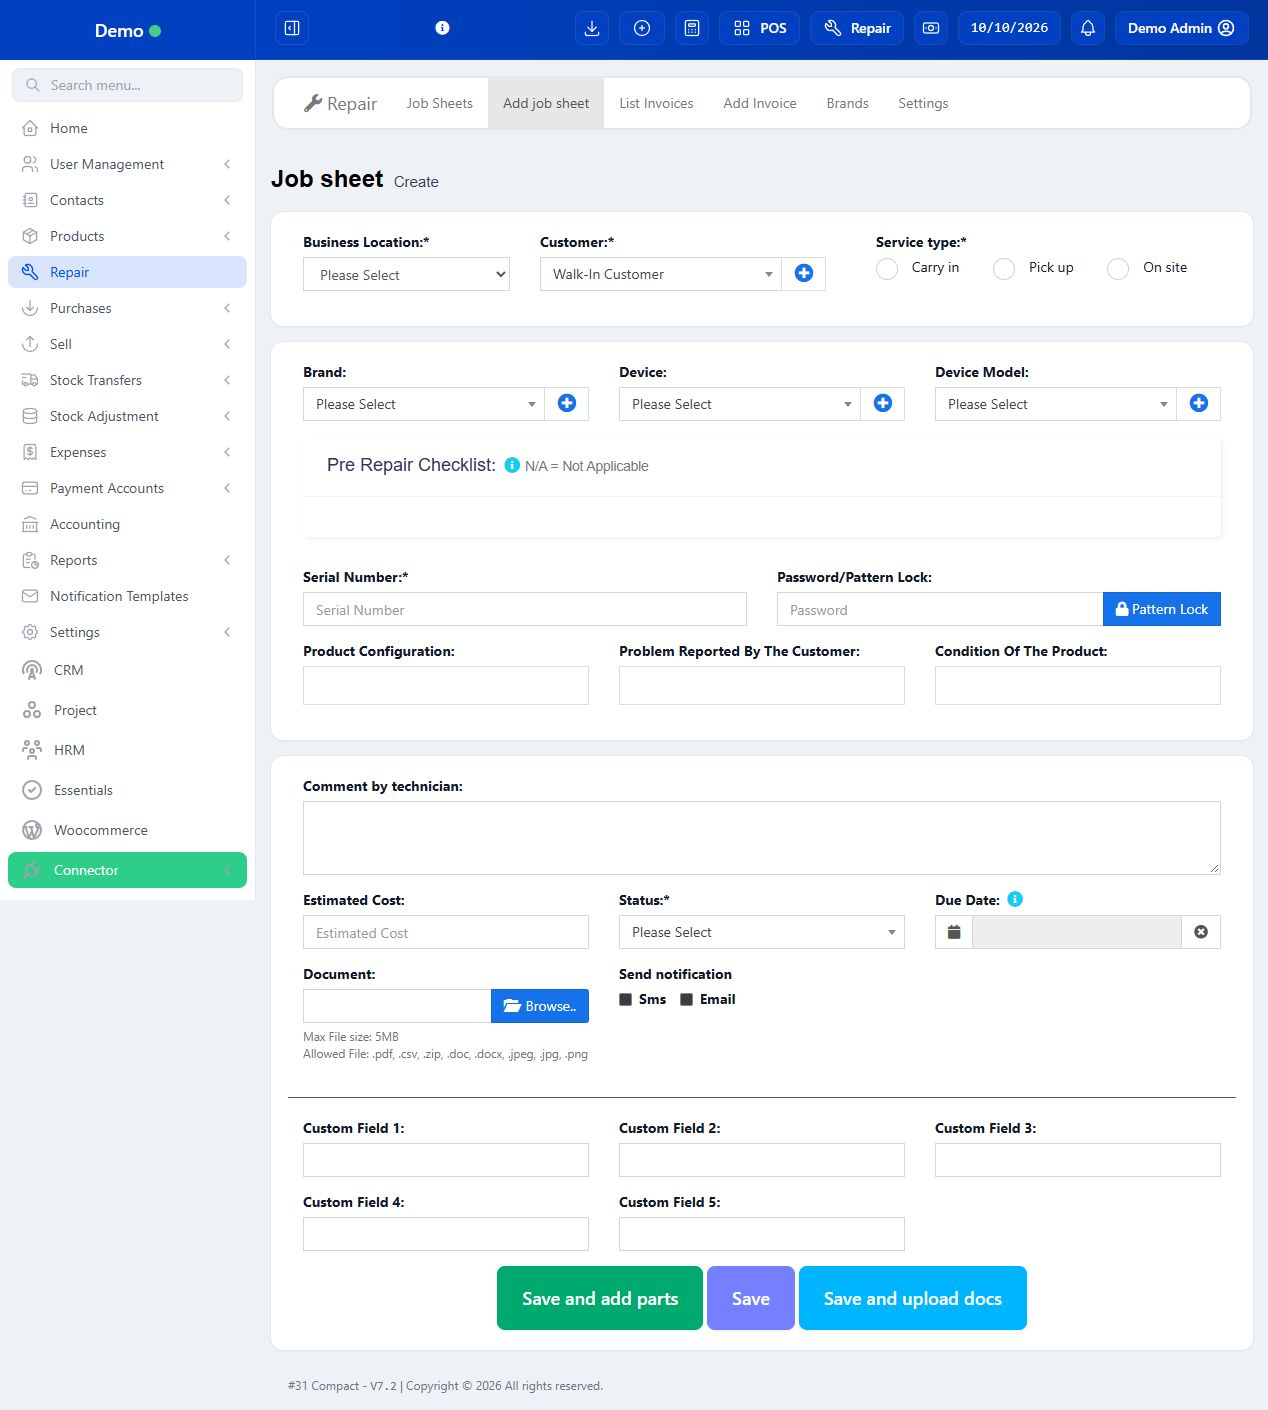
Use this while completing the form. A required field is marked with *; conditional fields appear only when enabled.
Field / control
What to enter or understand
Business Location / Customer *
Outlet receiving the item and the existing customer responsible for it. Check mobile number so collection and permitted notifications reach the right person.
Service Type *
Select the actual carry-in/pick-up/on-site option offered by your configuration; enter the visit/pick-up address when applicable.
Brand / Device / Device Model
Maker, broad device type and specific model. Define these in Repair Settings so technicians can filter consistently.
Serial number *
Identifies the physical item. Copy it accurately; two identical phone models can belong to different customers.
Passcode
Sensitive device-access detail if required for the authorised work. Do not put customer credentials on public screenshots or ordinary invoice notes.
Product configuration
Relevant specifications such as storage/capacity or installed components. Record what affects diagnosis and part selection.
Problem reported by customer
The customer’s account of the fault. Keep it distinct from the technician’s confirmed diagnosis.
Condition of product
Intake condition, visible damage and accessories received. Record observations before taking custody.
Assign service staff / technician comment
Person responsible and their work notes. Assignment does not itself complete the repair.
Estimated cost / Due date
Expected charge and promised completion time. An estimate is not a finalized invoice or proof of payment.
Status *
Configured workflow stage. Completion flags/notification behavior depend on the status setup; choose the appropriate stage, not just a pleasing colour.
Document / custom fields
Intake photos and business-specific information. Upload only relevant permitted files; control who can access them.
Send notification: SMS / Email
Explicit outbound messaging selection. Confirm contact and configured gateway/template before sending; saving the job is separate from permission to message a customer.
Parts / repair invoice lines
Actual product variations, quantities, prices and service charges. Check physical use and stock; a proposed part list is not automatically a paid invoice.
Pre Repair Checklist
Model-specific intake checks where configured. Mark the actual condition and N/A only when the check does not apply.
Save / Save and add parts / Save and upload docs
Save the intake alone, or save and continue directly to parts/documents. Review the saved job reference in each case.
Before you start Owner/manager access is needed to maintain shared workflow choices.
Steps
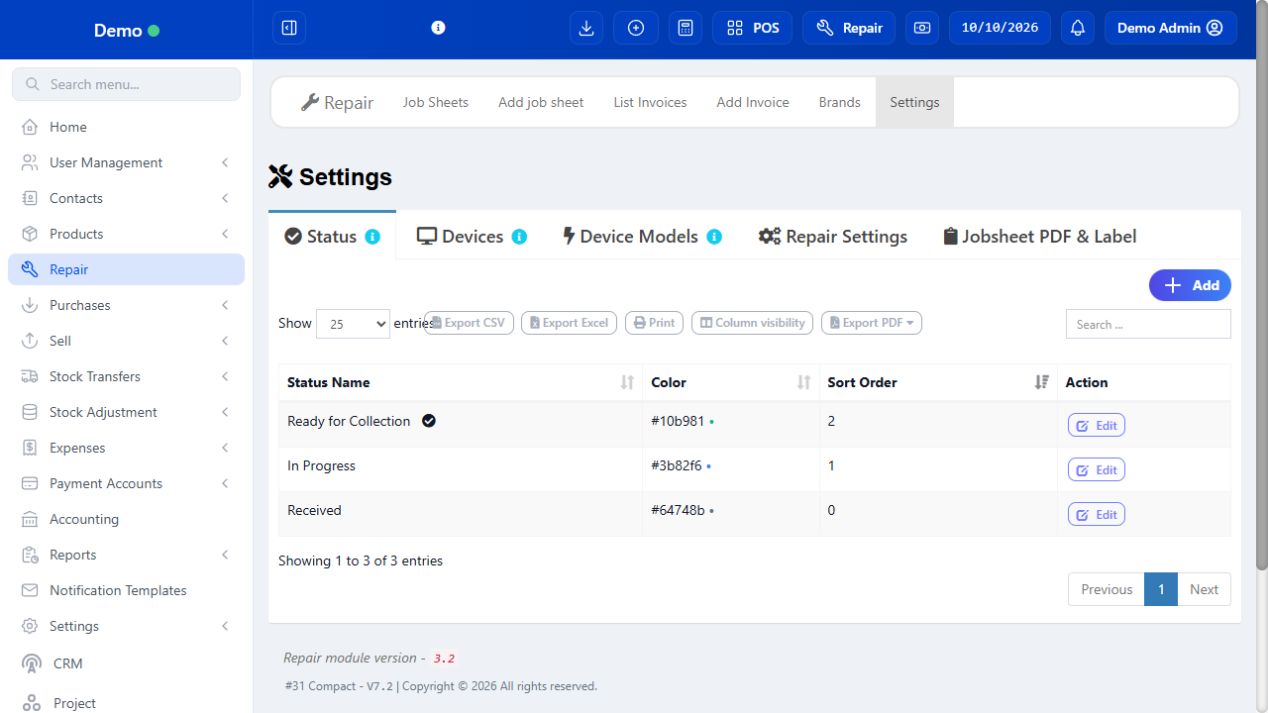
Open Settings and review Status. Create understandable stages such as Received, Diagnosing, Waiting for parts and Ready, using the controls actually offered.
Review any completion/default/notification options before saving. A completed flag can affect how jobs appear; do not set every stage as completed.
Under Devices, add types such as Phone or Printer. Under Device Models, choose the corresponding brand/device and enter the model.
Review Repair settings and Job sheet PDF settings for job references, custom fields, terms and printed intake presentation.
Open an unsaved Add Job Sheet form and confirm the intended model/status choices appear. Train reception and technicians on the same stage definitions.
SCREEN GUIDE Configure repair statuses, devices and models — look for the controls described in the steps. Select the screenshot to enlarge; optional fields may differ in your business.
Check the result Staff can describe devices and progress consistently.
Before you start Have the customer and item present and record its condition before accepting it.
Steps
Select Business Location and the existing Customer. Search by saved name/mobile to avoid a duplicate contact; add a customer only when genuinely new.
Choose Service Type, Brand, Device and Device Model. Enter the physical Serial number and relevant configuration.
Record the Problem reported by customer and Condition of product separately. List accessories received and visible damage in the appropriate fields.
Assign service staff if known, choose the intake status and due date, and enter the estimated cost if agreed. Store necessary technician notes in the appropriate field.
Attach permitted intake photos/documents. Review any notification checkboxes and leave them unselected unless an approved message is intended.
Save the job sheet and note its reference. Reopen it from Job Sheets to check customer, serial, assigned person and due date before handing out the intake copy.
SCREEN GUIDE Create a job sheet at intake — look for the controls described in the steps. Select the screenshot to enlarge; optional fields may differ in your business.
Check the result One traceable job sheet identifies the customer’s device and promised work.
Where to go Repair → Job Sheets → row Actions / View
Before you start Use the saved job reference and check print settings first.
Steps
Find the job by reference/customer/serial and open its detail or row Actions.
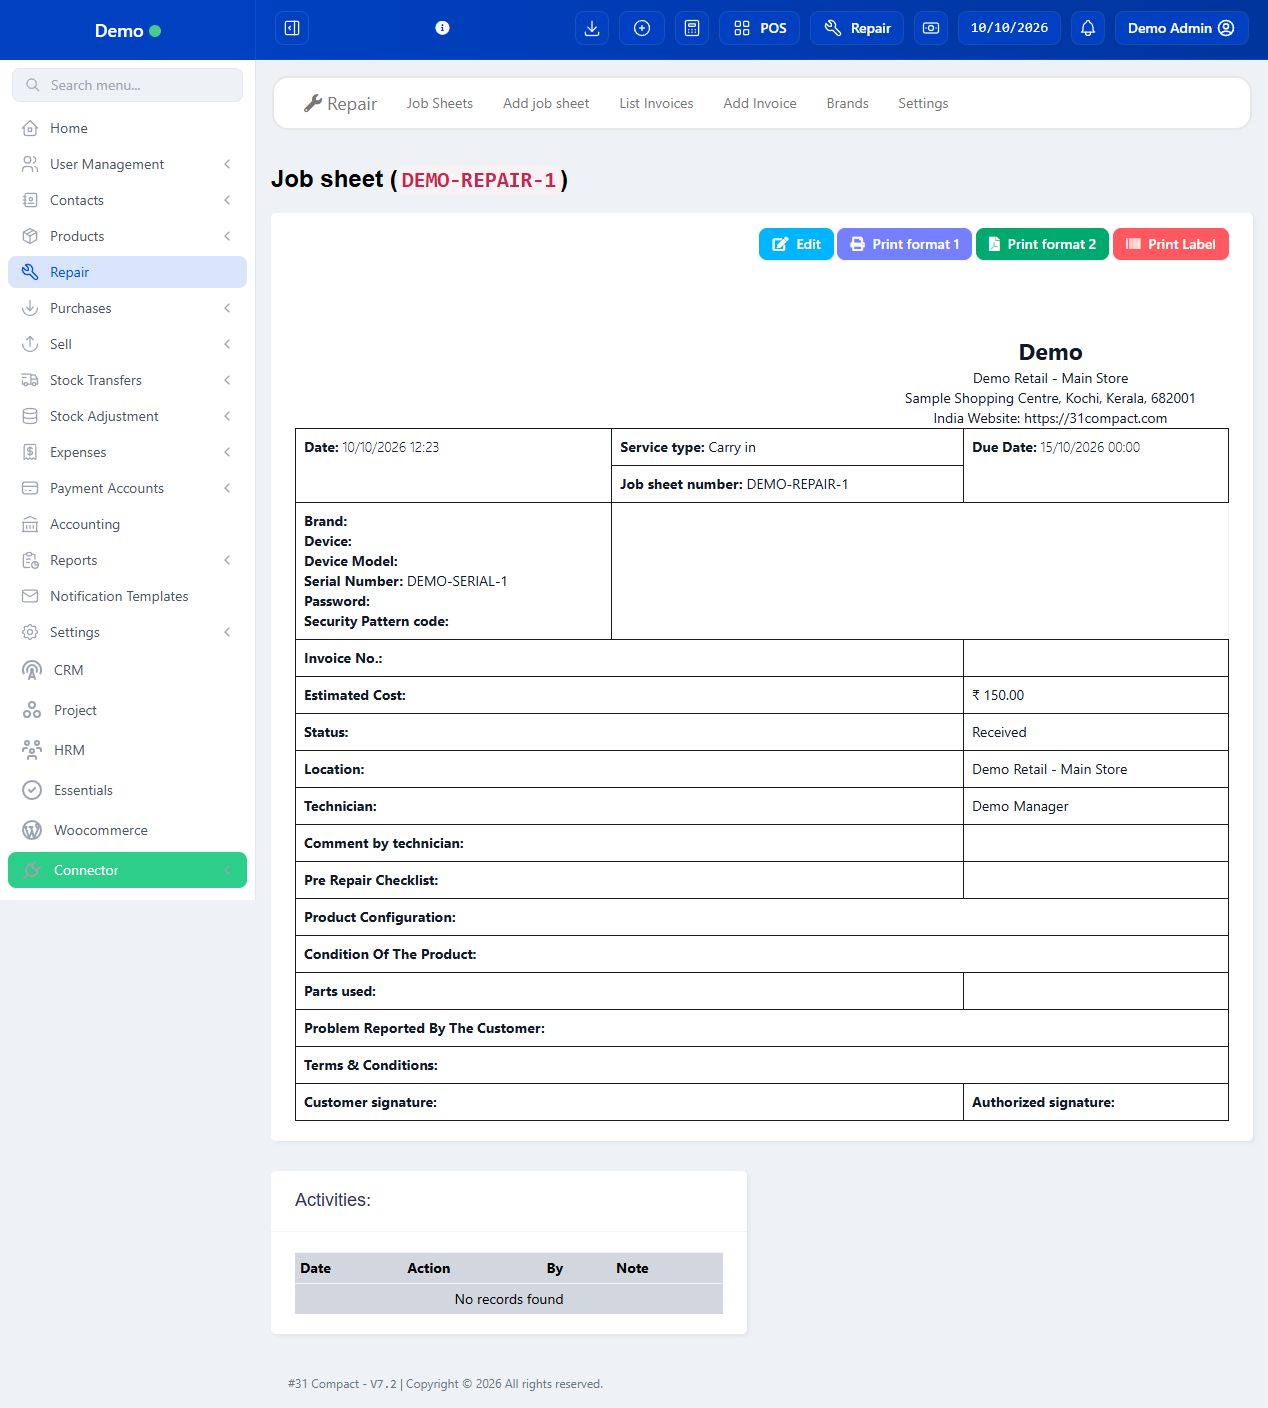
Choose the offered job-sheet print/PDF action. Check the customer, serial, condition, estimate and terms in the preview.
Use the offered label action when the device needs an identifying workshop tag. Preview the job identifier and model before printing.
Print a readable intake copy/tag at the matching paper size. Keep confidential device-access information out of unnecessary customer copies.
Attach the tag to the correct device and accessories. Reprinting an existing job does not create another job or invoice.
SCREEN GUIDE Print the job sheet or item label — look for the controls described in the steps. Select the screenshot to enlarge; optional fields may differ in your business.
Check the result The customer and workshop can reference the same intake record.
Where to go Repair → Job Sheets → View / Edit / status action
Before you start The technician must have access to the job or assigned-job permission.
Steps
Filter Job Sheets by location, status and technician. Open the correct reference and review reported issue, intake condition and attachments.
Use the assignment/edit control to select the responsible service staff. Save and confirm it appears in the job details.
Record diagnostic findings in technician comments/notes. Distinguish confirmed work from the customer’s original fault description.
Change the job status as the work progresses, for example waiting for parts or ready for collection, using the configured choices.
Review notification recipients and message before any permitted send. Check the activity/history so another staff member understands what changed.
SCREEN GUIDE Assign a technician and update job progress — look for the controls described in the steps. Select the screenshot to enlarge; optional fields may differ in your business.
Check the result The job shows the current owner, work notes and real stage.
Before you start Confirm the appropriate product variation and physical stock at the repair outlet.
Steps
Open the saved job and choose its Add parts/parts control where offered.
Search and select the specific part variation. Enter the quantity and review the unit and any displayed price/stock.
Record only parts needed for this job and save the list. Correct a mistaken unsaved row before submission.
When creating the repair invoice, review which parts were brought into billing and compare quantities with the actual work.
Check stock history after the final billing workflow. Do not also make a separate retail sale for the same parts without a reason; that can duplicate charges/stock movement.
SCREEN GUIDE Add required parts to a job — look for the controls described in the steps. Select the screenshot to enlarge; optional fields may differ in your business.
Check the result The job’s part requirement and invoice quantities can be reconciled.
Where to go Repair → Job Sheets → invoice action; or Repair → Add Invoice
Before you start Confirm completed/approved work and obtain permission for any changed charge.
Steps
Prefer the saved job’s invoice action when offered so the invoice remains connected to the intake record. If using Add Invoice, select the correct customer and job/device details on the repair sale screen.
Review the linked job reference, serial and status. Add the actual parts and the configured service/labour item; do not treat an estimated cost as the final line automatically.
Check quantities, unit prices, discounts and applicable tax. Read the final total and customer notes/terms.
Record the actual payment method and amount. Leave a genuine unpaid balance when the customer has not paid; do not mark a quotation as a paid repair.
Save through the offered invoice workflow. Open List Invoices, confirm the bill and payment history, and preview/print the customer invoice.
Check the linked job stage and activity independently. Billing/payment completion does not prove the device was handed back.
SCREEN GUIDE Add a repair invoice from the job — look for the controls described in the steps. Select the screenshot to enlarge; optional fields may differ in your business.
Check the result The repair has a traceable bill for the agreed work and actual payment.
Before you start Match the collecting person/device to the saved job and invoice.
Steps
Open the repair invoice and inspect payment history and remaining due. Collect only the verified outstanding balance.
Use the offered Add payment action with the correct date, method and reference, then reopen the bill to confirm the balance.
Review the job’s work notes and condition, explain the repair and warranty terms shown on the approved document.
Return the correct device and listed accessories. Update the job to the configured delivered/completed stage only after the actual handover.
Provide the invoice and retain the job/invoice references for follow-up. If a customer reports a recurring fault, consult the original job instead of silently overwriting its history.
SCREEN GUIDE Collect a repair balance and return the item — look for the controls described in the steps. Select the screenshot to enlarge; optional fields may differ in your business.
Check the result Money and physical handover are recorded separately and both can be checked.
Where to go Repair → Dashboard / Job Sheets / List Invoices
Before you start Use the same outlet and date filters across the review.
Steps
Use the dashboard to identify workload, then open the underlying job list rather than relying only on a summary number.
Filter open jobs by status/technician and examine due dates. Contact the responsible staff for jobs waiting on approval or parts.
Compare ready/completed jobs with invoices and unpaid balances. A completed workshop job may still have a receivable.
Review activity/documents for disputed or delayed jobs. Correct factual details through the authorised edit flow and preserve traceability.
Give the next shift a list of pending job references, next actions and promised dates.
Check the result Reception and technicians agree on outstanding jobs and balances.
IN PRACTICE
A practical example
A customer brings a printer with paper jams. Reception records serial P-DEMO-01, two cables received and a scratched lid, then assigns a technician and an estimate. The technician records a worn roller and adds the correct part. The invoice bills the agreed roller and labour, records actual payment, and the job is marked handed over only after the printer and cables are returned.
Common questions
Why is my job not in a technician’s list?
Check assignment, location/date/status filters and assigned-job versus view-all permissions.
Is the estimated cost already a sale?
No. It is an estimate on intake; create and check the repair invoice separately.
Where is Add Job Sheet in Android POS?
The full Repair job-sheet and technician workflow is documented for the web portal. Use the browser for this module.
Does changing status send a message?
It depends on status/settings and the selected notification controls. Review recipient and configured template; do not assume every save is silent.