Start with the product structure, then its pricing and stock. Single is one sellable item. Variable is one family with separately priced and stocked variations, such as a T-shirt in Small and Large. Combo is a bundle made from existing product variations and component quantities. A service is not a fourth Product Type in the inspected form: a non-stock service can be entered as a Single product with Manage Stock disabled. Lots and serial numbers are tracking details, not new product types. Create products on the web; the current native apps sell and display downloaded products rather than provide the full catalogue-maintenance form.
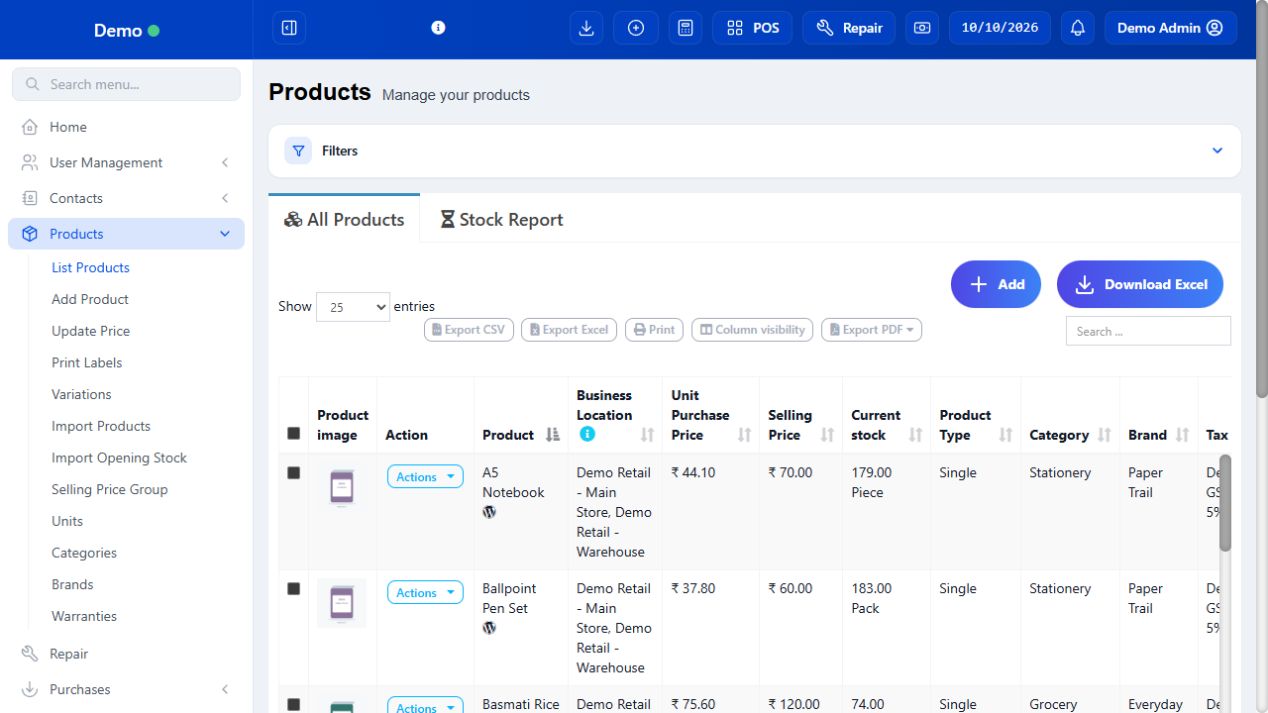
SCREEN GUIDE Products — module overview. Select the screenshot to enlarge; optional fields may differ in your business.
Field reference
Use this while completing the form. A required field is marked with *; conditional fields appear only when enabled.
Field / control
What to enter or understand
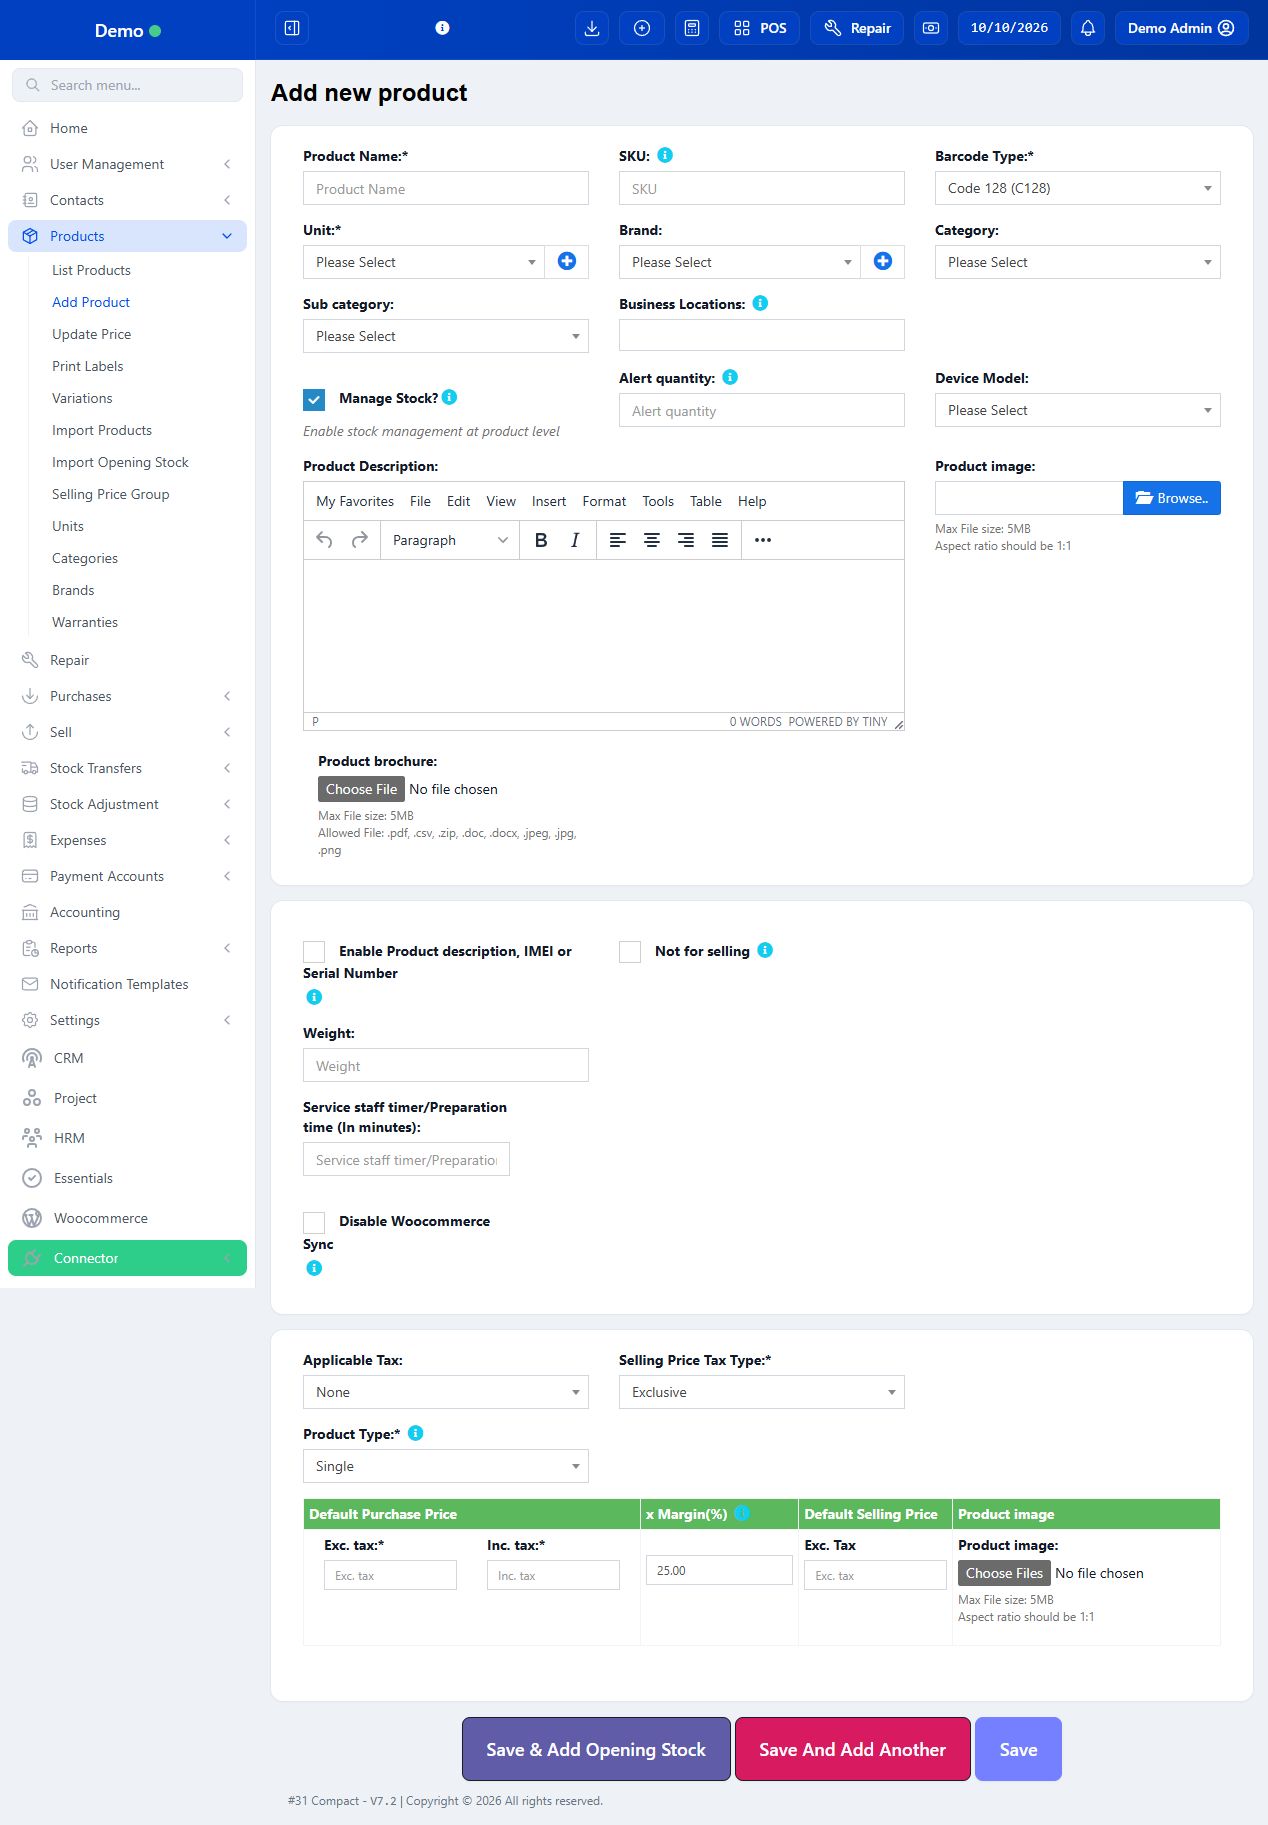
Product Name *
Customer-facing name. Include pack size or model where necessary: Drinking Water 500 ml is clearer than Water. A star marks a required field.
SKU
Internal product code/barcode value. Enter a unique existing code or let the configured SKU generation apply when blank. Avoid reusing one code for different items; preserve leading zeros in imports.
Barcode Type *
Barcode encoding used for labels, such as Code 128. Choose one compatible with your code and scanner. Barcode Type does not supply the code itself.
Unit *
Base measurement used for quantity and stock, such as Piece, Bottle or Kg. Configure decimal support under Units. Changing units after stock exists can make quantities misleading.
Related sub units (conditional)
Alternate selling/purchase units with configured conversion to the base unit. A box containing 12 pieces must have the right conversion; it is not just a renamed unit.
Secondary unit (conditional)
An additional measurement where enabled. Treat it as separate from converted sub units and review how your transaction screen records it.
Brand / Category / Sub category
Brand identifies the maker; category/subcategory organise catalogue filters and reports. Create taxonomy entries first or use the permitted quick-add control.
Business Locations
Locations where the product is available for use. Selecting a location does not give it stock: enter opening stock, purchase or transfer.
Manage Stock?
Enabled for counted goods. Disabled for non-stock services. A stock setting affects inventory behavior and should not be changed merely to bypass a shortage.
Alert quantity
Low-stock threshold for alerts. It does not order stock automatically. Review alerts by outlet and base unit.
Product Description
Detailed specification in the rich-text editor. Its visibility on customer documents depends on invoice/settings; it is not the Product Name.
Product image
Main catalogue image. The inspected form requests square 1:1 images and allows up to 5 MB. Resize a clear image before upload; inspect the current limit if it differs.
Variation images
Images for an individual single/variable row where offered. Use the correct variant image, especially for colours or models.
Product brochure
Optional supporting document in an allowed format. It is not automatically a receipt attachment. Use only files appropriate for staff/customer access.
Enable Product description, IMEI or Serial Number
Enables extra transaction-line detail for serial/IMEI or description. This does not itself preload every device serial into stock.
Not for selling
For internal-only items that should not be offered as normal sale products. It does not mean the item has zero stock.
Weight
Additional product attribute. Do not assume entering it automatically changes the selected unit, shipping cost or weigh-scale integration.
Service staff timer / Preparation time
Expected preparation time in minutes for configured service workflows. Optional for ordinary retail goods.
Warranty (conditional)
Select a configured warranty when the feature is enabled; check invoice display. It is separate from expiry or repair status.
Expires in (conditional)
Shelf-life duration in days/months for the configured manufacturing-date/expiry approach. Actual stock expiry is entered on purchase/opening-stock lots.
Rack / Row / Position (conditional)
Per-location shelf coordinates for picking stock. They describe storage position, not warehouse quantity.
Device Model (Repair module)
Links applicable items/parts to a repair device model. Use it when the Repair catalogue workflow requires the association.
Custom fields (conditional)
Administrator-labelled text/date/dropdown attributes. Follow your business’s meaning; a field labelled HSN needs a deliberate invoice/report mapping.
Disable WooCommerce Sync (conditional)
Excludes the item from the configured WooCommerce product sync. This does not disconnect the whole shop.
Applicable Tax / Selling Price Tax Type
Rate or group and inclusive/exclusive meaning. Read the GST chapter before pricing; a tax registration number is not a rate.
Product Type *
Single, Variable or Combo. Decide before entering stock and transactions; switching structure later is not a safe substitute for correcting an item.
Default Purchase Price Exc. tax / Inc. tax
Default per-unit buying cost before/after tax. Actual purchase rows can use the supplier’s actual cost; product default is not proof of a paid purchase.
x Margin (%)
Price suggestion based on cost. Despite the displayed label, the client formula uses cost × (1 + percentage / 100), which is markup on cost, not gross margin on selling price. Review final price manually.
Default Selling Price
Active price entry with the displayed Inc. tax or Exc. tax label. The label changes with tax type. Price-group values may override this default in sales.
Variable: variation / value / SKU
Choose a variation template, enter each distinct value and individual SKU/cost/selling price. Size S and Size L are separately identified inventory variations.
Combo: component / quantity / unit
Existing product variations and the quantities needed for one bundle. Review each component’s stock behavior; this is not a manufacturing recipe workflow.
Save actions
Save stores the catalogue record; Save And Add Another opens a new form; Save & Add Opening Stock continues to quantity entry; Save & Add Selling Price Group Prices appears when price groups exist.
Before you start Have the product name, unit, SKU/barcode, buying price, selling price and tax ready.
Steps
Enter Product Name and a unique SKU. Select barcode type, unit, brand and category. Choose the locations that will use this product.
Leave Manage Stock enabled for physical stock. Set an alert quantity if you want low-stock warnings. Use Not for selling only for items that must not appear for sale.
Add a product image. Choose Single for one item or Variable for sizes/colours with separate variations. Add the required variation values and prices.
Choose Applicable Tax and inclusive/exclusive tax type. Enter purchase and selling prices in the correctly labelled fields and inspect the resulting tax-inclusive values.
Choose Save, Save And Add Another or Save & Add Opening Stock. Check the product in List Products and in the intended location.
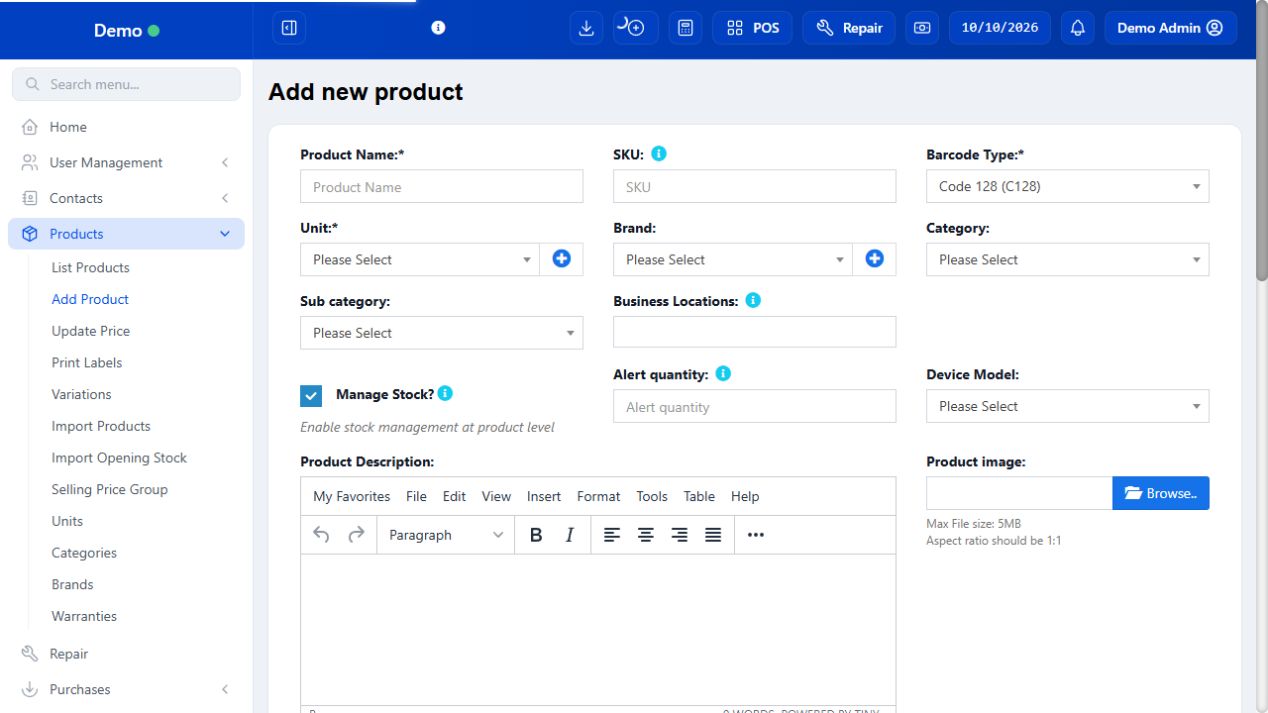
SCREEN GUIDE Create a stock item — look for the controls described in the steps. Select the screenshot to enlarge; optional fields may differ in your business.
Check the result The product can be found by name, SKU or barcode and its stock is tracked where enabled.
Before you start Decide how the shop counts and sells the item.
Steps
Use Single for a bottle of water, one specific device or a non-stock service. Give each separate packaged item its own identifiable code.
Use Variable for options sold from one family, such as Shirt → Size → S/M/L. Each variation can have different cost, price, barcode and stock.
Use Combo for a configured bundle of existing components, such as a gift set containing one mug and two tea packs. Add the actual component variations and quantities.
For a service, keep Single and disable Manage Stock only when no inventory quantity needs tracking. Set the unit and tax deliberately.
If an item is lot-tracked, still select its appropriate Single/Variable structure. Enable business lot/expiry tracking and enter lot data when receiving stock.
Check the product in List Products before adding opening stock. Avoid restructuring a product that already has transaction history without the manager’s plan.
Check the result The product structure matches how staff buy, count, search and sell it.
Where to go Products → Variations; Add Product → Variable
Before you start Create the variation template and values before using it in products.
Steps
Open Variations and add a template such as Size with values S, M and L. Use consistent values to avoid duplicate Large/L entries.
Add the parent product name, unit, category, locations, stock setting and tax, then select Variable.
Choose SKU-Number or SKUVariation format where offered. Review generated variation codes; enter separate existing barcodes if the packs already have them.
Select the variation template and enter the intended values. Use the row controls to add/remove only the unsaved rows you need.
Enter each value’s purchase cost, markup and selling price. Use copy controls only when the rows genuinely share those values. Add variation images if useful.
Save & Add Opening Stock, then count each size separately at each outlet. Search and scan a sample SKU on POS and verify the selected value and price.
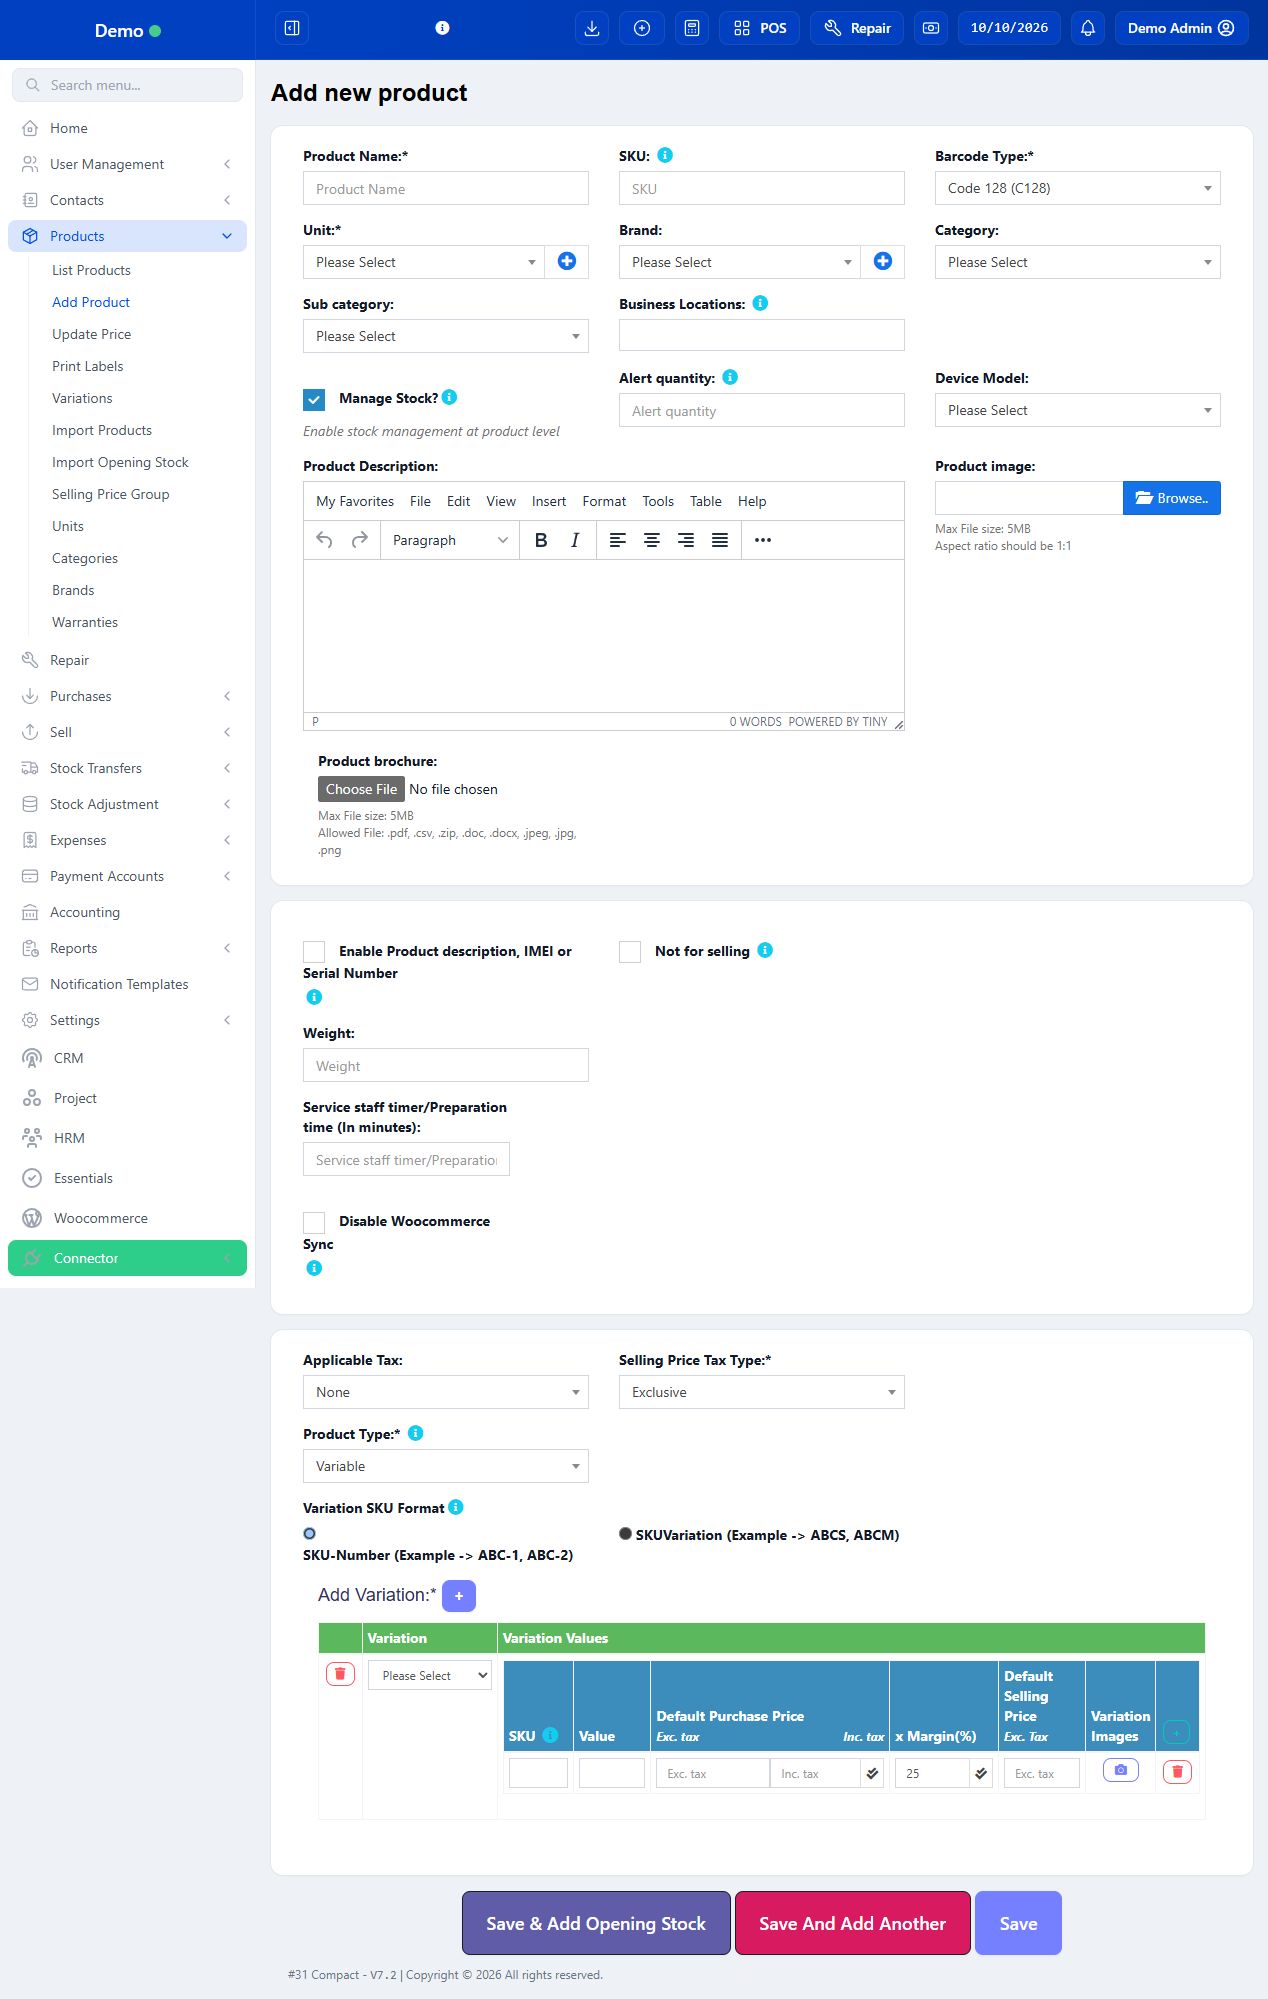
SCREEN GUIDE Add a variable product with separate SKUs — look for the controls described in the steps. Select the screenshot to enlarge; optional fields may differ in your business.
Check the result Each variation can be located and sold without mixing its stock with another value.
Before you start Create the component products and ensure they have the correct variation/unit first.
Steps
Enter the bundle name, unique SKU, catalogue details, locations and tax. Select Combo in Product Type.
Search for each component and select its correct variation. Enter the component quantity used in one bundle, using the unit shown.
Review component totals and the bundle selling price. Two units of a tea pack is different from two boxes of packs; confirm conversion before saving.
Save the bundle and run an approved demo sale. Compare before/after component stock and the selling total.
If components are out of stock, investigate component availability rather than adding fictitious stock for the bundle. Do not record the same components as a second sale.
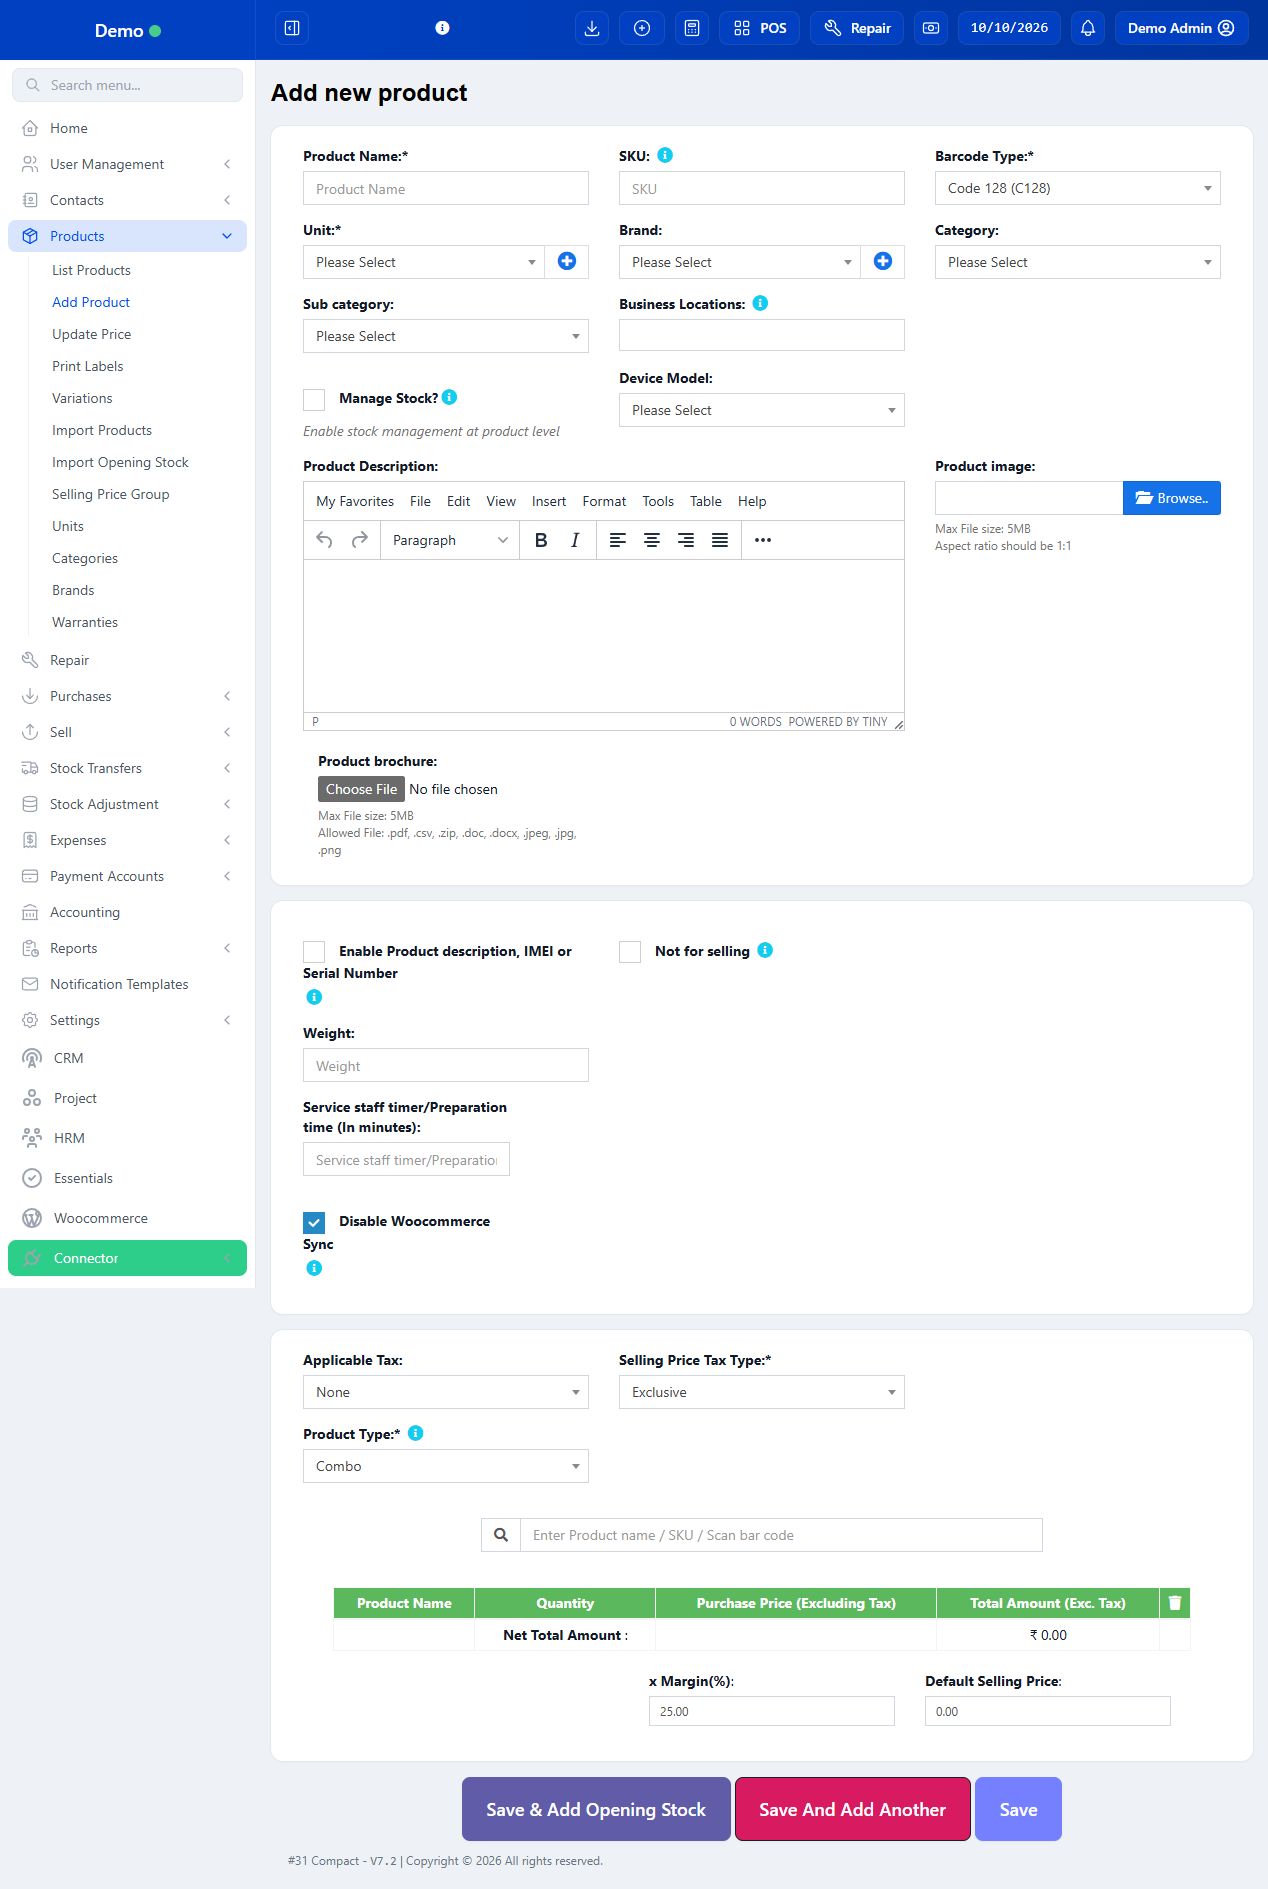
SCREEN GUIDE Create a combo or bundle — look for the controls described in the steps. Select the screenshot to enlarge; optional fields may differ in your business.
Check the result The bundle is identified and its component quantities are deliberate.
Where to go Products → Units / Categories / Brands
Before you start Decide base measurement and conversion rules before importing stock.
Steps
Create a Unit with its full name, short name and decimal-quantity choice. Piece usually uses whole quantities; Kg can permit decimals.
Where sub units are enabled, select the base unit and enter the conversion. A Box of 12 uses twelve base Pieces; verify the purchase and sale entry screens.
Create broad Categories, then Sub categories under the appropriate parent. Enter Brands separately; a brand is not a category.
Return to Add/Edit Product and assign these values. Choose only relevant business locations.
Check a sample fractional sale or box receipt. Compare stock in the base unit and the invoice unit so staff understand what the numbers mean.
Check the result Catalogue classification and stock quantities are consistent.
Where to go Products → Selling Price Group; List Products → group-price action
Before you start Prepare the approved prices for each customer segment.
Steps
Add a Selling Price Group such as Wholesale. A price group defines a price list; a customer group classifies contacts and is a different record.
Open the product’s group-price action, or Save & Add Selling Price Group Prices after creation when offered.
Enter the intended group price for each relevant variation. Read its tax label and save; do not presume the default price was copied to all variations.
Select the intended selling price group on the supported sale/location configuration and load a sample product.
Check the price actually used and customer assignment. A manual line-price override can differ from the stored group price; review permission and policy.
Check the result The appropriate price is offered on transactions using that group.
Before you start Use saved products and the actual label stock/paper size. Printing labels does not add stock.
Steps
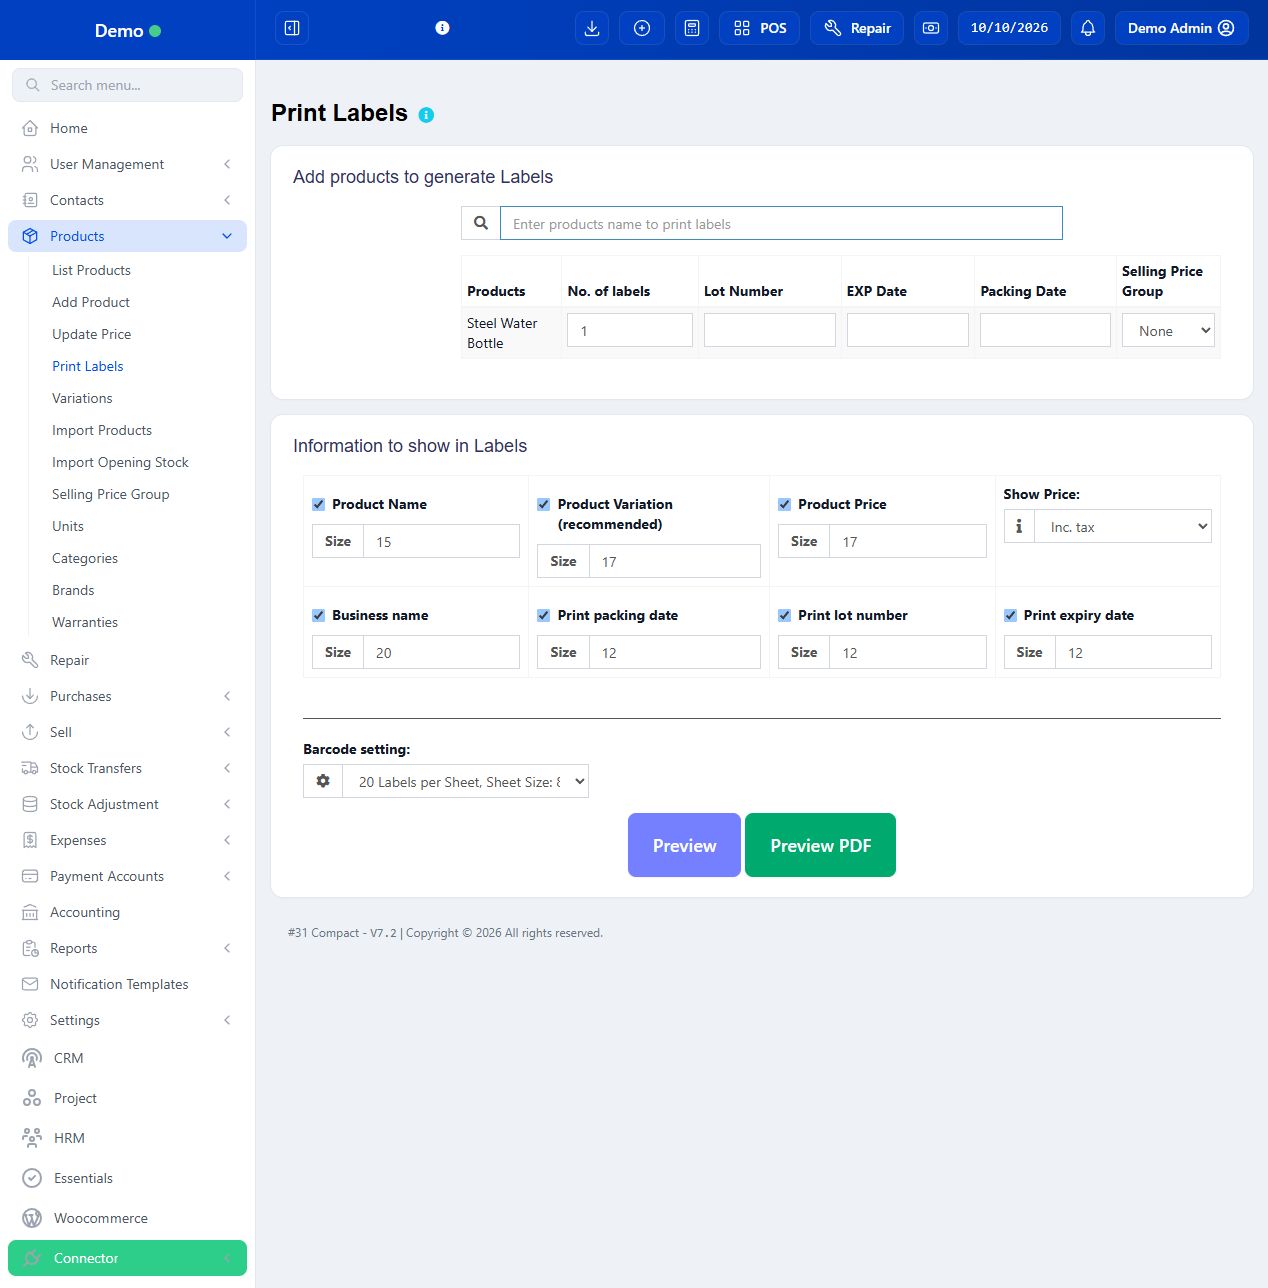
Open Print Labels and search by product name or code. Select the exact product/variation, then add any other items to the label table.
Enter No. of labels for each row. This is the number to print, not an inventory correction. Choose the relevant lot, expiry and packing date when those controls are enabled.
Select the Selling Price Group if the labels need its price. Choose which information to print: name, variation, price, business name and permitted batch/date details.
Choose inclusive or exclusive price display deliberately. Set text sizes so important information remains readable on the physical label.
Select the Barcode Setting matching your sheet or roll. Review Preview before printing and check barcode, variation, price and total label count.
Print one test label at the correct physical size with the printer driver. Avoid browser fit-to-page scaling that shrinks the barcode.
Scan the test in POS to confirm the intended product/variation. Only then print the full batch.
SCREEN GUIDE Print product barcode labels — look for the controls described in the steps. Select the screenshot to enlarge; optional fields may differ in your business.
Check the result The label is readable and scans to the correct item.
Where to go Products → List Products → Actions → Edit / Update Price
Before you start Identify whether the problem is name, price, assignment or quantity.
Steps
Search the SKU and view the correct variation. Edit name/category/image for catalogue corrections; use the intended price action for approved future price changes.
If stock quantity is wrong, use Stock History and the relevant purchase/opening stock/adjustment workflow. A product price edit does not fix quantity.
Check product-location assignments if the item is absent at one counter. Check Not for selling and stock restrictions if it is not selectable.
Save and reload the product in a new transaction. Do not assume editing the product rewrites old invoices.
Refresh the native app’s data online. Download a new offline snapshot when catalogue/price changes must be used offline.
SCREEN GUIDE Correct a product and verify the effect — look for the controls described in the steps. Select the screenshot to enlarge; optional fields may differ in your business.
Check the result The next sale sees the intended catalogue values while old transaction records remain traceable.
IN PRACTICE
A practical example
For a shop starting with 20 bottles of water and 6 mugs: create two Single stock products, assign Main Store, and enter opening quantities 20 and 6 there. A stock alert of 5 is a reminder threshold. A Service charge item is Single with stock disabled. A Mug + Tea gift set is Combo, with its component quantities, not another opening-stock copy of the same mugs.
Common questions
Why can I see the product but not sell it?
Check outlet assignment, Not for selling, variation stock, lot restrictions and cashier permissions.
Is default purchase price the last supplier bill?
No. It is a catalogue default; actual supplier receipts and costs are entered on purchases.
Why do labels show the wrong price?
Check the chosen selling price group and inclusive/exclusive label setting, then generate a new preview.
Can I fix stock by changing Manage Stock?
Do not use the stock toggle as a correction. Investigate Stock History and enter the appropriate stock transaction.