A purchase records goods from a supplier and its payable/payment. The status controls the receiving stage, while payment status controls money owed. Ordered goods are not necessarily received stock. Supplier invoice/reference is separate from Compact’s internal reference. Review supplier cost, tax, batch and expiry before saving, particularly when using scanned bill suggestions.
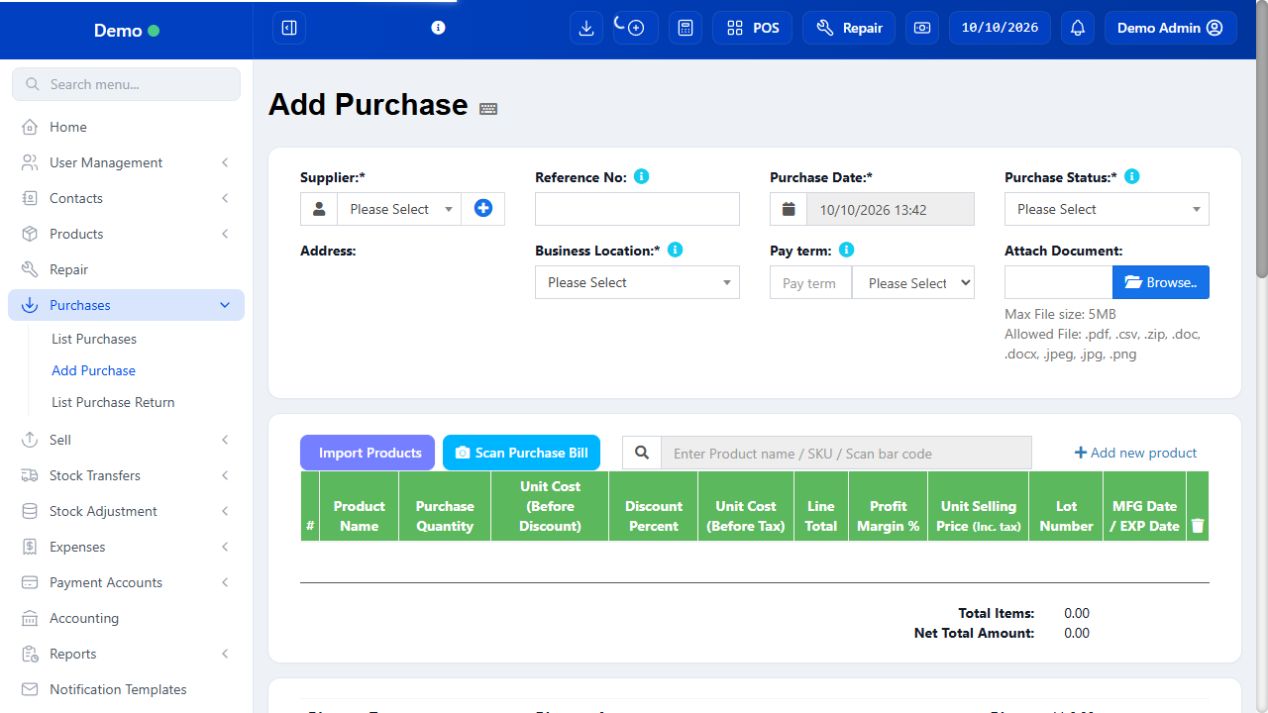
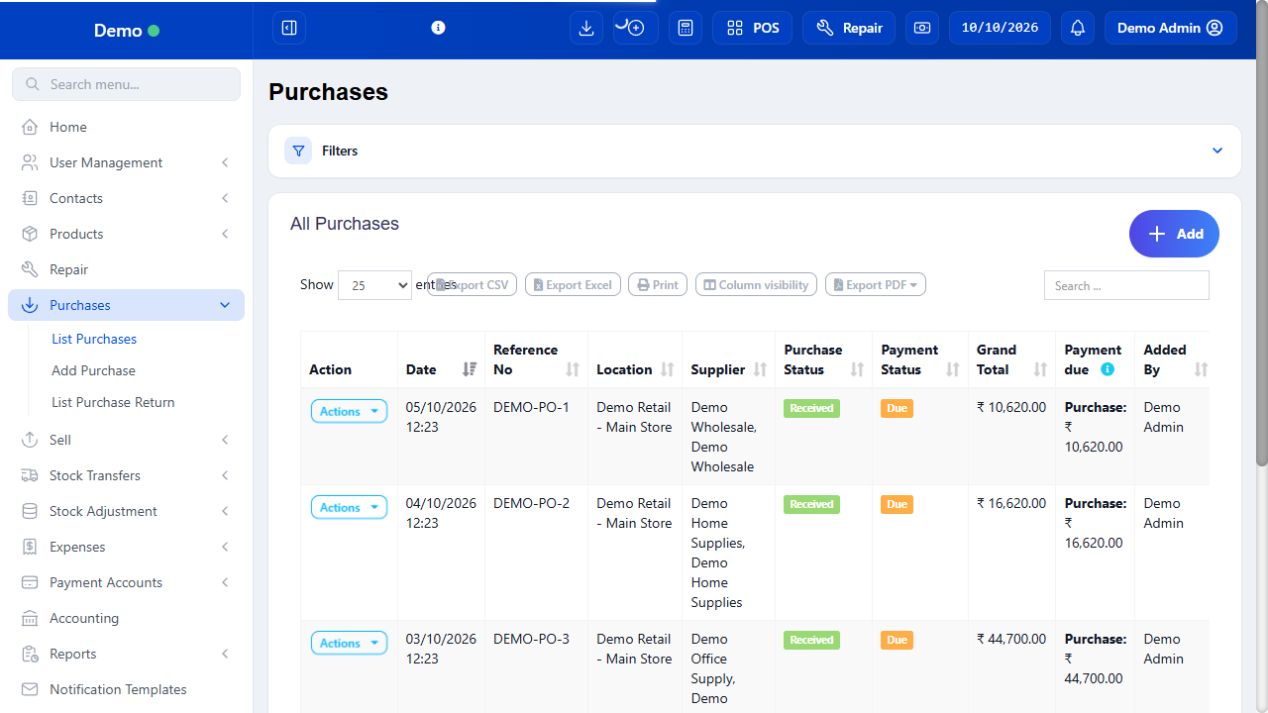
SCREEN GUIDE Purchases — module overview. Select the screenshot to enlarge; optional fields may differ in your business.
Field reference
Use this while completing the form. A required field is marked with *; conditional fields appear only when enabled.
Field / control
What to enter or understand
Supplier / Reference / Date
Existing supplier, its bill reference and the actual purchase date. Use the supplier reference to detect duplicate entry.
Status / Location
Receiving stage and receiving outlet. Check received stock after the appropriate status.
Payment terms / Exchange rate
Due period and currency conversion when offered. Do not confuse days/months or overwrite an unfamiliar exchange rate.
Product / quantity / unit / variation
Actual received item and its measuring unit; verify box conversions.
Unit cost / line discount / tax
Supplier cost and tax treatment. Catalogue default cost may need correction to the real bill.
Lot / manufacturing / expiry
The actual batch/date printed on the goods when enabled, not an arbitrary product-wide expiry.
Order IDs / shipping / charges
Links to purchasing orders and additional costs where offered; check they are not counted twice.
Payment / account / amount
Money paid now, not automatically the entire supplier invoice.
Document / notes / custom fields
Supporting supplier bill and business details. A scan result still requires human review.
Before you start Create the supplier and catalogue items first, and have the supplier invoice available.
Steps
Select Supplier, purchase date, reference number, purchase status and business location. Product search becomes available after the required selections.
Search product name/SKU or scan a barcode. Enter received quantity, unit cost, tax, discount, lot number and expiry where enabled.
Review invoice discount, tax, shipping and additional charges. Attach the supplier document when useful.
In Add payment, record only the amount actually paid, method, account and note. Leave an unpaid balance if payment is still due.
Compare totals with the supplier invoice, Save and open the purchase in List Purchases. Check stock at the receiving location and supplier due.
SCREEN GUIDE Receive a supplier purchase — look for the controls described in the steps. Select the screenshot to enlarge; optional fields may differ in your business.
Check the result A received purchase updates stock; the supplier balance reflects its payments.
Before you start Use the original purchase, supplier and location.
Steps
Search the reference/date and view the purchase. Use its payment action to record a later supplier payment.
For returned goods, select Purchase Return on the relevant purchase or use the purchase-return workflow provided by your list.
Enter the quantities being returned, review the credit/refund details and save only after confirming the goods movement.
Check List Purchase Return, stock history and supplier ledger. Record a refund payment if the supplier actually reimburses you.
SCREEN GUIDE Pay or return a purchase — look for the controls described in the steps. Select the screenshot to enlarge; optional fields may differ in your business.
Check the result Stock and supplier balances follow the return/payment records.
Before you start Compare the physical receipt and original supplier bill side by side.
Steps
Confirm supplier, bill reference, date, location and receiving status. Search the purchase list for an existing identical bill.
Check every product/variation and the unit. Convert pack quantities correctly, then review actual unit cost and line discounts.
Enter lot and dates from the goods. Check tax-inclusive/exclusive cost and the invoice-level tax choice so it is not repeated incorrectly.
Add shipping/charges once and compare final total to the supplier bill. Explain a legitimate difference rather than silently forcing quantities.
Record actual payment only. Save and check the purchase detail, outlet stock and supplier ledger separately.
Check the result Received quantities, cost and payable can all be reconciled to the supplier bill.
PROCEDURE 05
Use purchase orders and requisitions where enabled #
Where to go Purchases → Purchase Order / Purchase Requisition
Before you start These menus depend on business features and role access.
Steps
Use a requisition to record an internal need where that workflow is enabled; specify requested products, quantities, outlet and date.
Create the approved purchase order for the supplier. Review quantities, prices and expected terms before sending it.
When goods arrive, use the offered purchase-from-order/link action or select the order on Add Purchase.
Record the actual receipt, including a partial delivery. Check remaining ordered quantity instead of assuming the whole order arrived.
Inspect stock and payable after the receipt status is saved. The order alone is not proof of received goods or paid supplier money.
Check the result Ordered and received quantities remain distinguishable.
IN PRACTICE
A practical example
Order 10 cartons, receive 6 today, and pay only part of the supplier bill. Record the six received cartons in the correct unit; keep the remaining order quantity and supplier due visible. Do not enter 10 as received just because the supplier order says 10.
Common questions
Why did stock not increase?
Check location, receiving status, variation and unit. A pending/ordered record may not be received stock.
Can Scan Purchase Bill save without review?
No. Verify matched products, quantities, costs, tax and totals before saving its suggestions.