A project is a container for work, people, dates and related records. Tasks describe individual deliverables. Time logs record time spent, not task completion. Project invoices bill the customer, not the employee’s payroll. Project Lead is the responsible staff user, distinct from a CRM sales lead. Use the project’s settings to enable the optional time, documents and invoice tabs and to control what members can change.
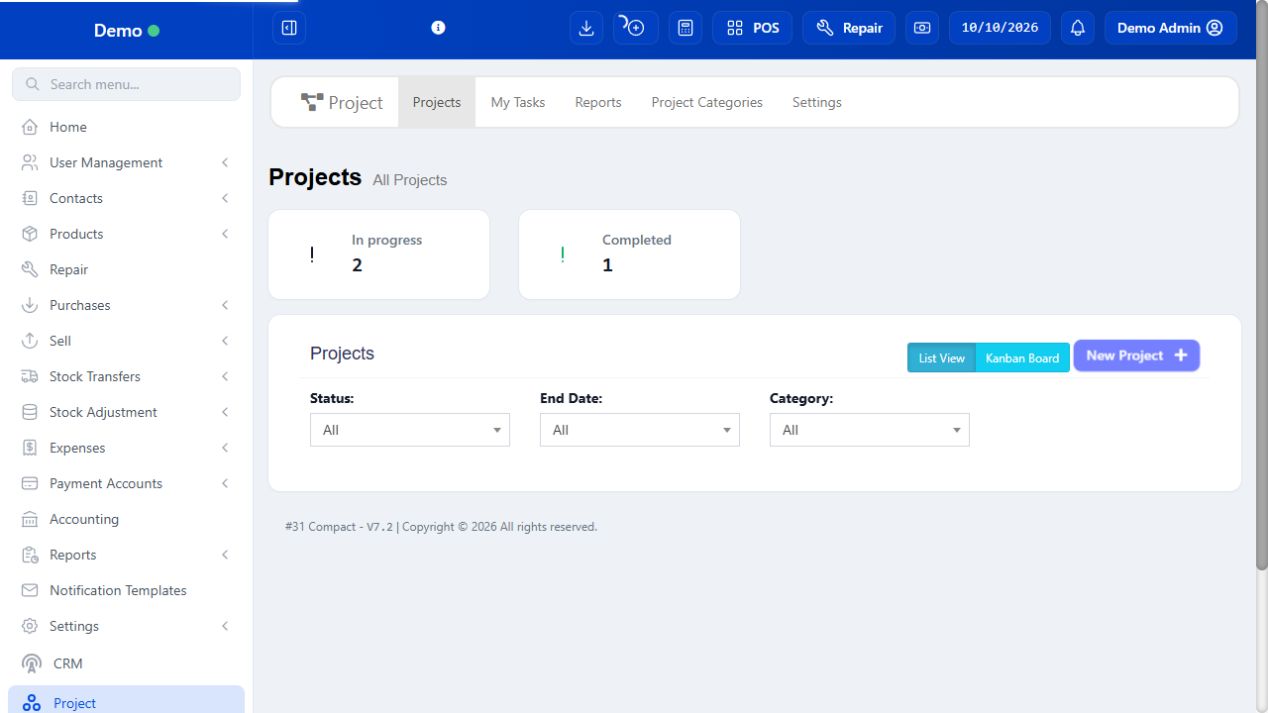
SCREEN GUIDE Project Management — module overview. Select the screenshot to enlarge; optional fields may differ in your business.
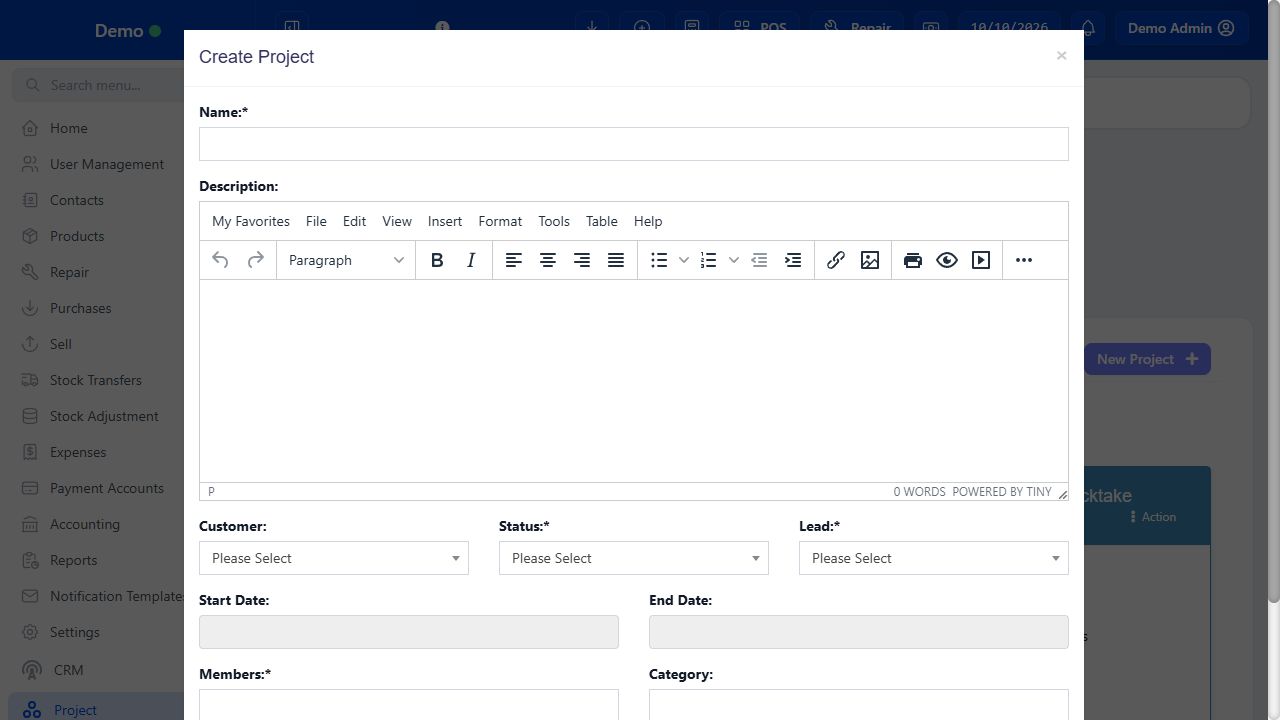
Field reference
Use this while completing the form. A required field is marked with *; conditional fields appear only when enabled.
Field / control
What to enter or understand
Name * / Description
Give the project a recognisable title and clear scope, acceptance criteria and exclusions. Avoid putting every small action only in the description.
Customer
Contact for customer work. Internal work may not require a customer until an invoice is needed.
Status *
The current overall project stage from configured choices. A project stage is separate from the status of each task.
Lead *
Responsible project user. This field does not select a CRM prospect.
Start date / End date
Planned dates for the project. Tasks have their own due dates; review both when a plan changes.
Members * / Categories
Staff who participate and one or more categories for organisation. Membership and edit permissions are separate checks.
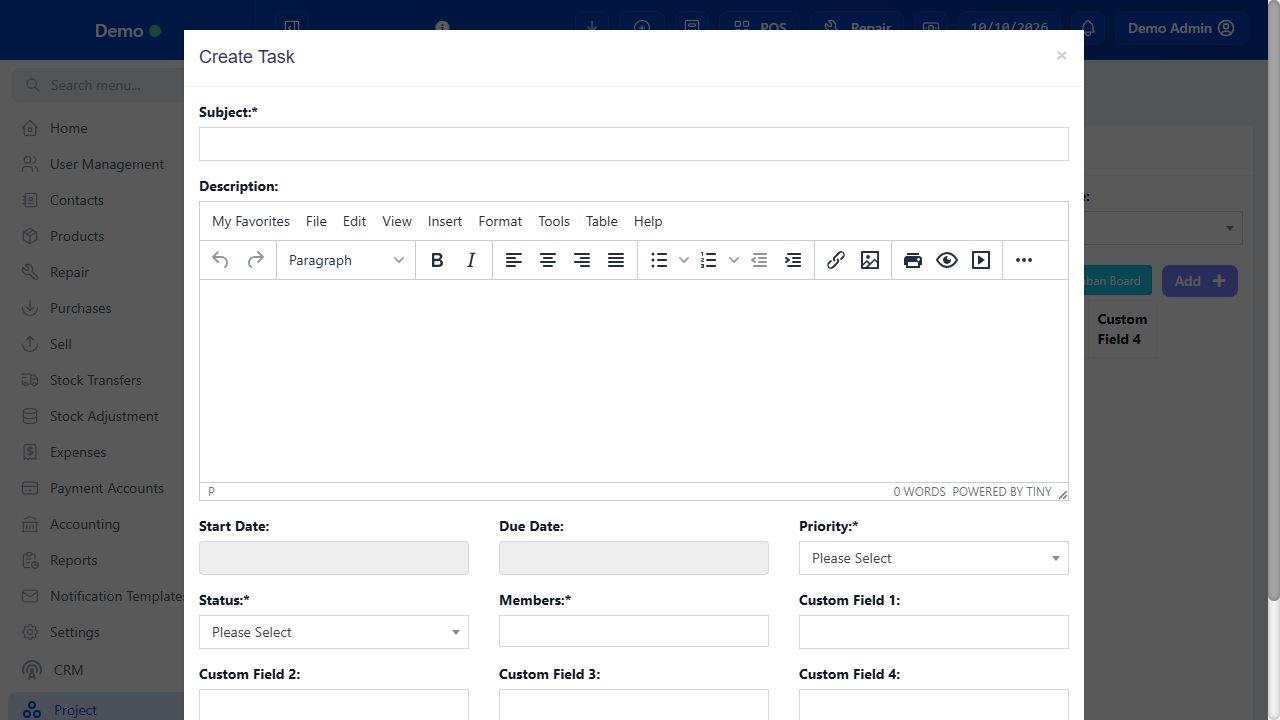
Task Subject * / Description
Specific work item and what counts as done. Include the output needed, not merely a vague topic.
Task Start date / Due date / Priority *
Scheduling and urgency for that task. Priority does not automatically change its due date.
Task Status * / Members *
Actual progress and responsible project members. A task assigned to nobody useful will still remain on the project.
Task custom fields
Additional business-specific values. Follow the administrator’s meaning; these are not mandatory for every project.
Time log Task / User / Start / End / Note
The person, work item and actual period worked. End must be later than start; avoid overlapping or duplicated logs.
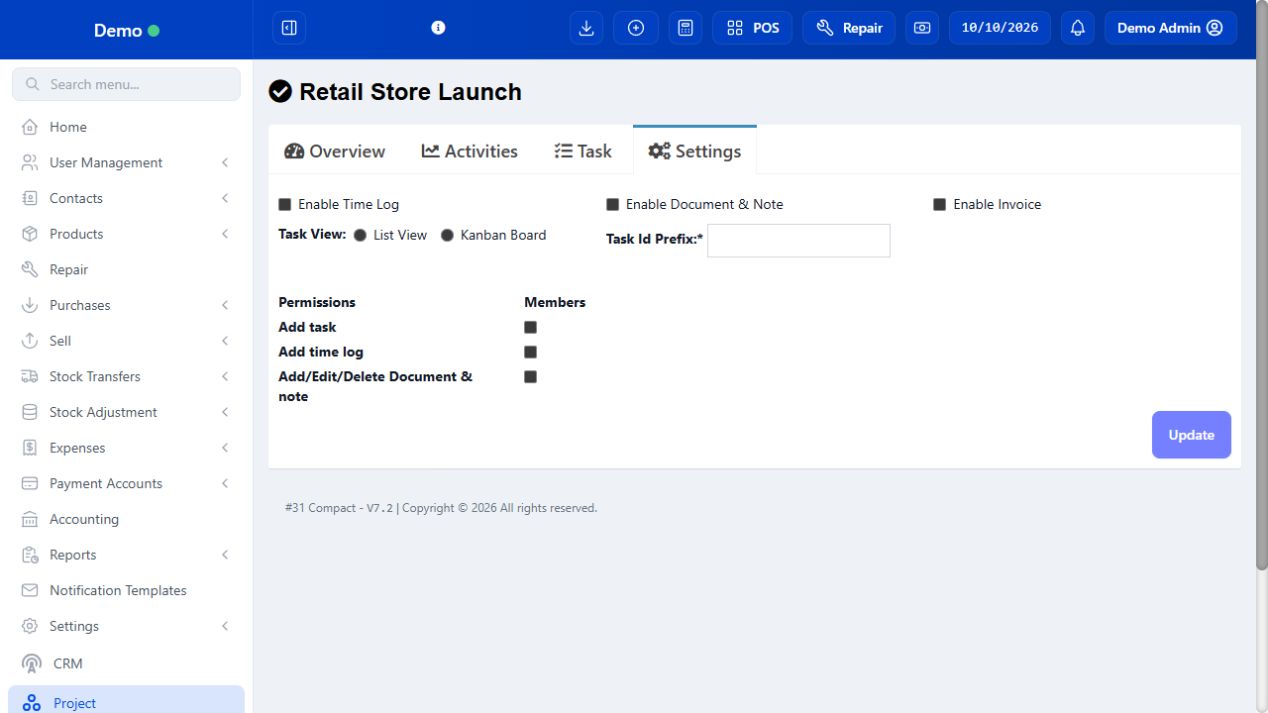
Project Settings
Time logs, notes/documents, invoices, list/Kanban view, task prefix and member add/edit controls where offered.
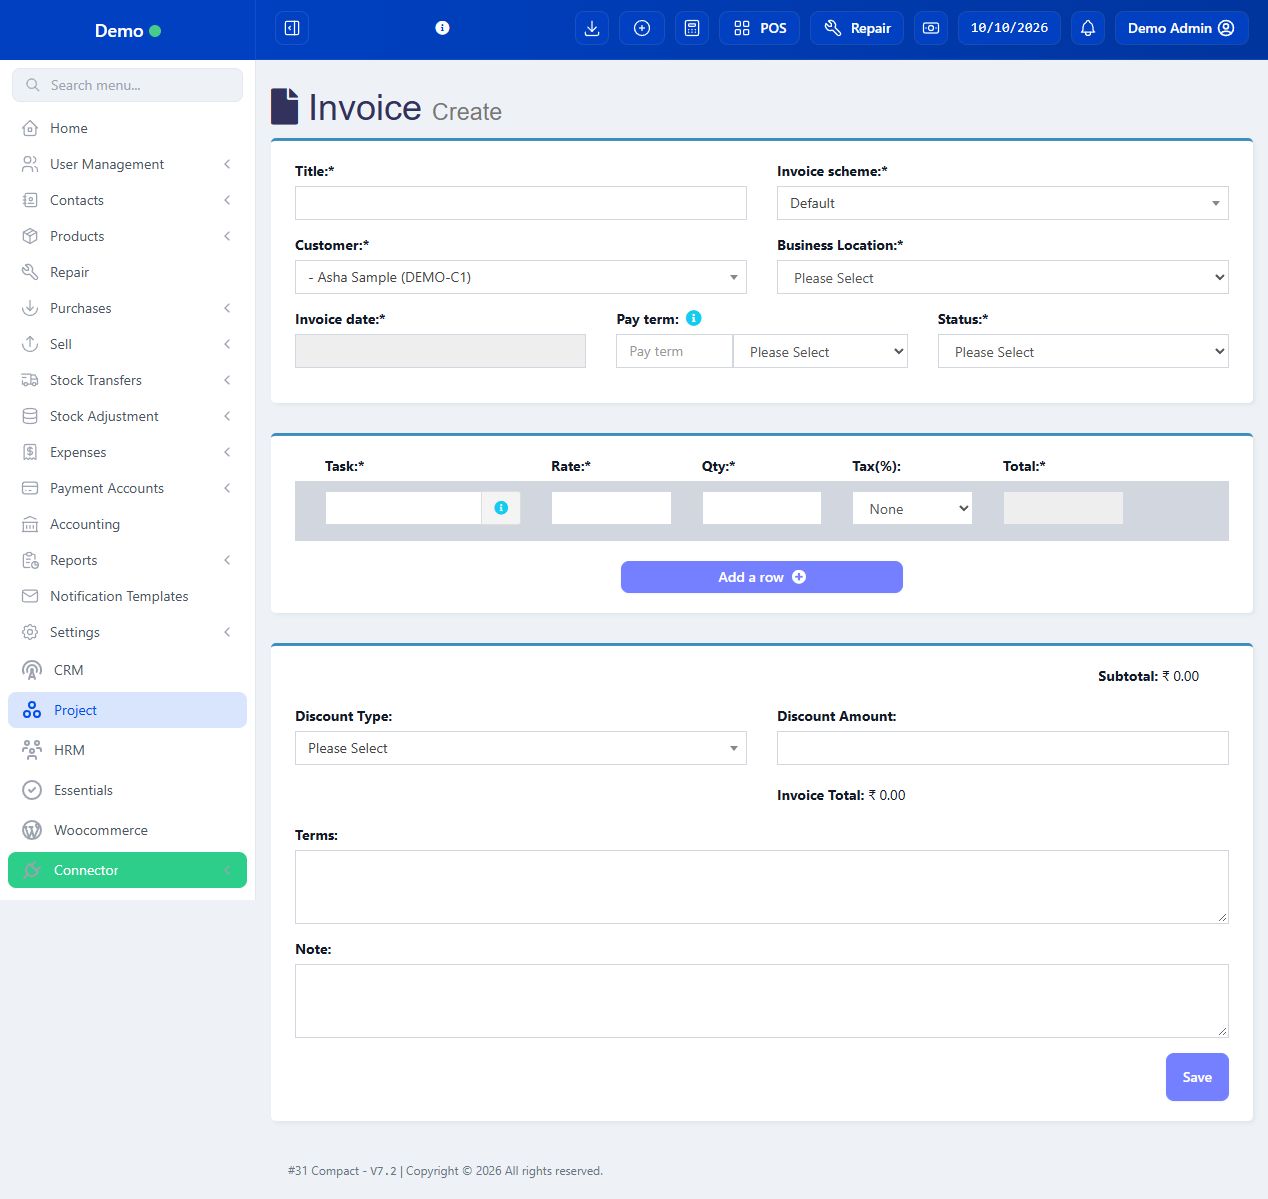
Invoice Title / Customer / Location / Date / Scheme
Billing identity and numbering. Required customer/location must match the intended business transaction.
Invoice Task / Rate / Quantity / Tax / Discount
Billable work lines and amounts. Recorded time is not automatically proof of an approved rate or billable quantity.
Where to go Project → Projects → Add / Create Project
Before you start Identify the lead, members and intended customer before entering the form.
Steps
Enter Name and Description. Describe the outcome, such as installing a shop’s shelving and training its staff, so the team understands the scope.
Select Customer when the project belongs to a client. Choose the overall Status and the staff user responsible as Lead.
Set Start date and End date realistically. Add the Members who will work on it and the intended project Categories.
Complete any configured custom fields using your business definitions. Save and reopen the project.
Check Overview for lead, dates and members. If a colleague cannot see it, review membership and role access before creating a duplicate project.
SCREEN GUIDE Create and plan a project — look for the controls described in the steps. Select the screenshot to enlarge; optional fields may differ in your business.
Check the result A project exists with a clear owner, scope and participating team.
Before you start The project lead or administrator normally controls these settings.
Steps
Open Settings for this project. Enable time logs, notes/documents and invoices only when the team will use those features.
Choose task List view or Kanban board where offered. Set a readable task ID prefix for references.
Review whether members can add/manage tasks, time logs and notes/documents. Give the access needed for the work without sharing the lead’s login.
Save settings, reopen the project and check which tabs actually appear. Tabs depend on both feature settings and user access.
Have a member review their own view. If an enabled feature still does not appear, ask the administrator to inspect access/configuration rather than promising an unavailable tab.
SCREEN GUIDE Set project tabs and member permissions — look for the controls described in the steps. Select the screenshot to enlarge; optional fields may differ in your business.
Check the result The project has the intended tools and staff access.
Before you start Break the project into work items that someone can finish and verify.
Steps
Choose Add Task and enter a specific Subject, such as Fit shelf in aisle 2. Explain the required output and checks in Description.
Set Start date and Due date. Select Priority and the actual starting Status.
Select Members from the project’s team. Assign the people accountable for this task; project membership alone is not a task assignment.
Complete applicable custom fields and Save. Open the task to confirm assignee, deadline and scope.
Create separate tasks for distinct deliverables rather than one unmanageable task called Complete project. Review the list with the team.
SCREEN GUIDE Create a task and assign its deliverable — look for the controls described in the steps. Select the screenshot to enlarge; optional fields may differ in your business.
Check the result The task has an accountable person and a clear completion condition.
Where to go Project → My Tasks; project → Task → View
Before you start Use your own staff account so updates are attributable.
Steps
Open My Tasks or the project task list. Set project/assignee/status/due-date filters to locate your current work.
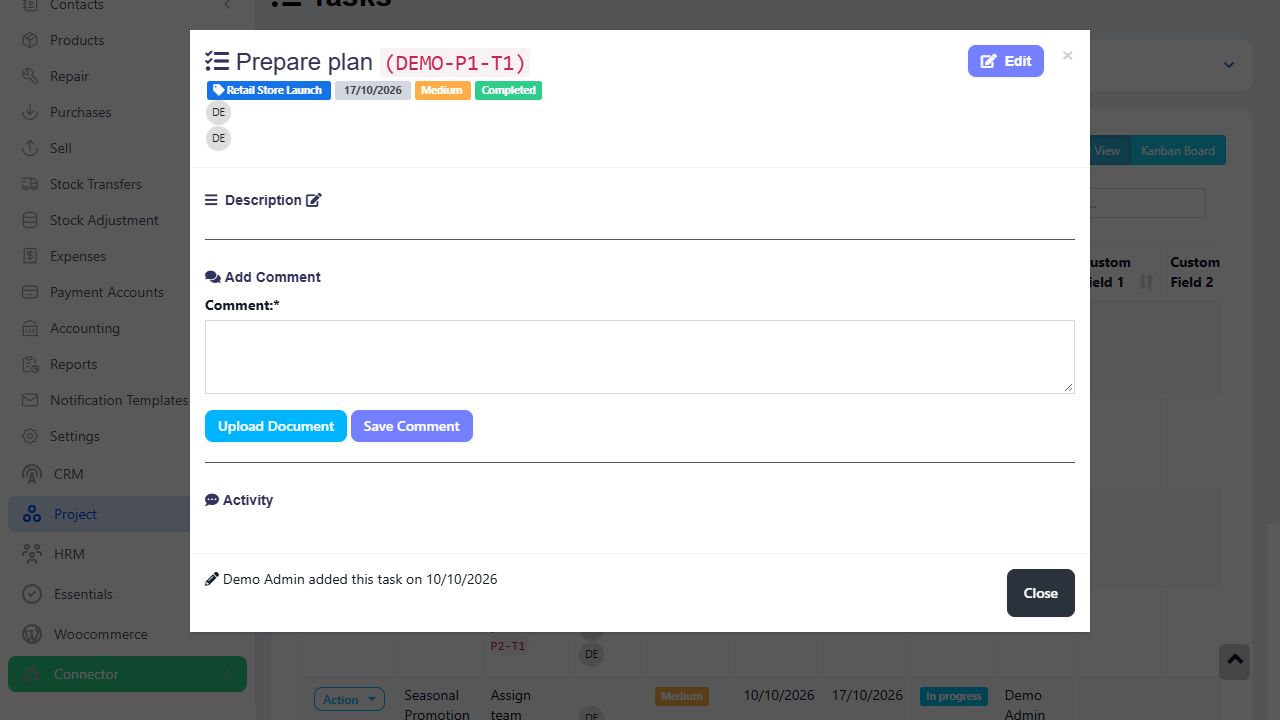
Open the task and read its description and existing discussion. Add a comment with the actual progress, question or blocker.
Change status through the offered status action when the stage changes. If a Kanban move is available, check the saved status after moving the card.
Update the due date/assignment through the authorised edit action when the lead agrees to a plan change. Explain significant changes in the discussion.
Mark the task completed only after the required output is checked. Check project Overview separately; completing one task does not necessarily close the entire project.
SCREEN GUIDE Work through tasks, comments and status — look for the controls described in the steps. Select the screenshot to enlarge; optional fields may differ in your business.
Check the result The task reflects actual work and the next person can understand its history.
Where to go Project → project → Time logs / task → time-log action
Before you start The project must expose the time-log feature and your role must permit it.
Steps
Choose Add time log and select the correct task and User if the form offers them.
Enter actual Start date/time and End date/time. Add a short Note describing the work performed, then Save.
Review the duration and task/project association in the list. A log of 10:00 to 11:30 represents 1 hour 30 minutes, not a quantity of 1.30 decimal hours.
Use Edit on the mistaken log when authorised. Check for overlapping entries before adding another log for the same period.
Open Project Reports → Project/Employee time-log report with the intended date range to review time recorded across staff.
SCREEN GUIDE Before recording time, review Enable Time Log and member permissions in Project Settings; the detailed time-log fields are explained above. Select the screenshot to enlarge; optional fields may differ in your business.
Check the result Work time is attributed to the correct task/person and can be reviewed.
Before you start Enable invoicing and use lead/admin access; confirm the customer-approved scope and rates.
Steps
Enter invoice Title, Invoice Scheme, Customer, Business Location and Invoice date. Set payment terms and the intended draft/final status offered by the form.
Add billable Task lines with Rate and Quantity. Check units/time interpretation; a time log is not automatically a customer-approved bill.
Select applicable tax and any authorised discount. Review each line and the total, then enter Terms and Notes appropriately.
Save the intended invoice and open its detail. Check customer, number, dates, lines and payment status.
Use the offered payment/view/print actions for that invoice. Do not also create a retail POS invoice for the same work unless the manager has a deliberate accounting reason.
SCREEN GUIDE Create a project invoice — look for the controls described in the steps. Select the screenshot to enlarge; optional fields may differ in your business.
Check the result The customer is billed once for the agreed project work.
Where to go Project → Reports; project → Overview / Edit
Before you start Review work, time and invoices separately before final closure.
Steps
Filter reports by project/person and date. Compare task completion and actual time with the plan.
Review open tasks, blocked items and notes. Reassign or correct due dates through the lead rather than hiding incomplete work.
Check the project invoices and outstanding payments. Completion of work and collection of money are distinct events.
Record a completion note and update the overall project status through its authorised edit action when the deliverables are accepted.
Keep the project and its history for reference. Do not delete completed projects simply to clean up the active list; filter by status.
Check the result The project is closed based on checked deliverables and traceable billing.
IN PRACTICE
A practical example
Shop setup project: create a project for Sample Customer, assign a manager as Lead and two staff as Members. Add Survey, Fit shelving and Train cashier as separate tasks. Log actual fitting time against its task, store the accepted layout in Documents & Notes, and create one agreed installation invoice. Review all tasks and invoice balance before closing the project.
Common questions
Why can I not assign a staff member to a task?
Check that the person is a project member and that you can edit task assignments.
Where are Time logs or Invoices?
Their visibility depends on project settings and role/lead access. Enable and verify the actual tab before planning its use.
Is Project Lead a CRM lead?
No. It is the staff user responsible for the project.
Why does a completed task not make the project completed?
The project contains several tasks and separate overall status. Review all deliverables and close the project through its own flow.